The Blog Contains Information About Blogging. It has Blogger Widgets, templates and Much More About Blogging.

Wednesday 27 November 2013

Importance of Alexa:


To attract visitors on your blog , you need to show them that your blog is the best and has a good traffic ,to serve this purpose ALEXA has introduced traffic widgets , these widgets display the traffic rank of your website and also the number of links in(i.e back links) and these widgets come in 3 dimensions button , vertical banner and banner. In this tutorial i am going to share about all types of Alexa widget for blogger. Here different sizes of Alexa widget so choose one of them and put it.That's all.


Add Alexa Traffic Rank Widget To Blogger Blog


Step by Step process to Add Alexa Traffic Widget to your Site


Firstly go to Alexa Internet - Traffic Widgets , now type the URL of your blog and click on build widget
Now log in to your blogger and browse to layout and click on Add gadget and click on HTML/JAVA script now paste the code that was copied from Alexa website and save the settings that's it you are done now you can find the Alexa traffic widget on your website
Posted by John Peter on 23:33 | No comments | Categories: , ,

Sunday 24 November 2013

Instant messaging service is at your finger tip for free!!! Now you can send SMS across globe to any mobile through your favorite social networking site, FACEBOOK. Till now we were using our mobiles to send sms, but now you can send through Facebook too using an application called "ChatSMS" which allows you to send free sms to any mobile across globe and that to FREE ! FREE !! FREE !!!


 An application in Facebook "ChatSMS" is one app that has text messaging trick to any country . To know how to send free sms from Facebook, follow the steps mentioned below:


Login to your Facebook account.
Type http://apps.facebook.com/chatsms/ in your browser and grant the permission for accessing the application.
In the displayed screen , you just have to type your country , the mobile number of the person whom you want to send the sms and the text to send. The only restriction of this application is you can only send 4 sms per day and 100 characters  is the limit of the text message. Other that these points, it works well for sending sms to any country , to any mobile, for free.

So how is this trick. I am sure you will definitely use this interesting app for your benefits.  
Posted by John Peter on 09:34 | No comments | Categories:
facebook ghost prank
Facebook is worlds popular social networking site.It is that success because most of them use Facebook for chatting with friends,sharing pictures,videos and some other information.And there are many Facebook tricks available to make use of Facebook effectively.Now here in this post i will let you a PRANK that makes your friends scary.


Note: Don't try this prank on Heart patients and kids.
Ghost Facebook Prank:

Just click here to go to GHOST PROFILE
As soon as click above link then you are directed to ghost profile
Just wait for few seconds then you will see that suddenly a ghost arises  from center of Facebook just like below
Now just copy the link and send to your friends

I used this tricks on my friends and many of friends are so scarred  especially girls are shouting when they watched this prank and scared a lot.
Posted by John Peter on 08:58 | No comments | Categories: ,

Saturday 23 November 2013

Send Friend Requests On Facebook When You Are Blocked
Hi friends, it is needless to say that Facebook is an good Social media that keeps us to be in always contact with our Relatives, friends, and Family.  But Facebook is also  very strict with their policies, even though it is for connecting the people all over world, it do not encourage the spam or adding strangers. Everyone had faced this problem once in your life , as you friend requests are blocked and you cannot send the friend request.
The Facebook is using this rule to just secure the people from spam and Make them more comfortable, More over the Pending of larger Facebook requests are the major reason for your ban
Better to clear the Pending friend requests, Today I am going to tell you how you can send the friend request on Facebook even though you are Blocked.
Send Friend Requests On Facebook When You Are Blocked
How to Send friend requests when you are Blocked

1.
When you are trying to add an friend (if you are blocked), you must need to knw the Email address of the Person whom you are going to add. First of all go to this link.
There are two ways to get the Email id of the Person:
  • By his/her Profile
  • By any other ways
If their email may be hidden we need to use something else to get it. Go to Yahoo.com and login with Facebook. Once you have set it all up click Import Contacts from Facebook. Boom, you have almost everyone in your friend lists email address. Search for your inbox sender and copy his email address. Lets say John's email is John@john.com
2. When you want to add more friends, better to create a Contact file
3. The Easy way to Create a Contact file is:
  • Create an new text document in notepad
  • Pate/add the Email addresses separated by comma (,)
  • Save this file with the Extension .vcf
  • The saved file is your Contact File

4.
Now upload your contact file by going to this link , after opening this link there are so many options, at the bottom we can see Other Tools  Click the Other Tools and you will find the Option to Upload your File

5.
Finally click on "OK" when you are done with your work.
That's all , if you like this tutorial please don't forget to subscribe to my blog and get the regular updates


Posted by John Peter on 01:08 | No comments | Categories: ,

Monday 18 November 2013

Permanently Stop Tagging on Facebook Timeline
I know you are tired of getting too much photo  and post tags on your Facebook timeline.No doubt Facebook is one of the best social networking site. It has more feature than any other social networking site and one of them is the feature that enables the users to tag their  friends in their posts and . It is a good feature only if it is used correctly. You should tag your friends only when you have to mention them in photos .It is so much annoying when someone tags you in irrelevant posts.Basic terminology of sharing and tagging according to Facebook, then read the below definitions.


Tagging: Tagging is the fastest way to share something on Facebook with multiple friends simultaneously. A user can share something with 45 friends simultaneously.
Sharing: Sharing something on Facebook is limited to a single person at one time. It concluded, A user will repeat the process again when he wants to share something with another friend. It does not give the option of multiple friends whenever to share something.

Permanently Stop Tagging on Facebook Timeline

Some Facebook experts already aware with this trick, how to disable or stop tagging on Facebook timeline, but i am dedicating this tutorial to those who are curiously want to know, how to stop Facebook unwanted tagging from your friends. follow the below given step by step guide how to completely stop tagging on Facebook timeline.
Go To Your Facebook Account and Click on Privacy option from the list.
Permanently Stop Tagging on Facebook Timeline

Click On Timeline and Tagging from The right Side layout options. Now Click on Edit option as you see in the below screenshot. Now Finally Click and Select Enabled Option


Permanently Stop Tagging on Facebook Timeline


After doing these customization, whenever a person tags you, tagged photos and posts will hooded for review.These posts will be visible on you timeline after approval. I wish this will help you. Also watch the video tutorial given below to understand better. Ask your questions by leaving your comments below.

Posted by John Peter on 03:41 | No comments | Categories:

Alexa Traffic Rank Extension
Alexa Traffic Rank Extension is now available to download and install on google chrome. You can find the widget in chrome gallery or simply following the links given below this post. When you click on the Alexa icon, a window appears that gives more information about that site.. You can easily browse to Alexa's search analytics page for the site, or see what it looked like in the past at the Way back Machine.You can   also see what the site's rank is,  how many domains link to it, how well it is, as well as related sites The Extension icon shows you graphically the rank of the site you are visiting, and if you hover your mouse over the icon you can see the Alexa Traffic Rank. Another benefit is inclusion in the Alexa Traffic Panel. This is the only Chrome Extension that includes you in Alexa panel, and of course only if you decide you want to participate. I have uploaded a video tutorial on adding this cool extension in your Google chrome please watch the video tutorial to know more about it.
Posted by John Peter on 01:19 | No comments | Categories: ,

Friday 15 November 2013

The instructions found here clearly say to drag and drop your .jar file onto that window, and voila! You are now the lucky owner of a Java game file which you can install on your Nokia mobile phone (and it worked in our case).Now you can create JAD files for JAR files using JAD maker. JAD amker is a tool to to create JAD files for JAR files.JADMaker is a small utility that allows you to create a JAD file for the .jar Java games on your Nokia mobile phone. It's the perfect recreational tool for people who simply refuse to put their cell away even for a second! JADMaker supports batch processing, so you can also simultaneously convert multiple JAR files, without having to waste too much precious time.
There is an Explorer Context-Menu extension available, so you can quickly generate a JAD file. During this conversion and after it, your program settings in Windows Registry remain unchanged.In conlusion, JADMaker is a must-have program for all Nokia users who like to kill time by playing on their mobile phone in the subway or bus while heading to work.
The bad part about JADMaker is that it only supports Nokia mobile phones, which is a huge disadvantage to the other brands. But who knows? The developer may have a change of heart and start upgrading the software.
Posted by John Peter on 05:58 | No comments | Categories: ,
Mouse
What if you are in emergency and your mouse stops working? what if you are not able to use your mouse because any other reason? How will you use your mouse in these situations. These questions are very complex but the answer is very simple, You can control your mouse pointer using mouse keys. Mouse keys a toll to use your computer as a mouse. By using mouse keys you can use your keyboard to easily navigate and control mouse pointer. After reading this article you will be able to use mouse keys in your computer. Mouse keys are are also supported in many other operating systems such as Linux and mac, so you don't need to worry if you are running any operating system. Procedures to turn on mouse keys are same for almost all operating systems.

How To Turn On Mouse Keys To Control Mouse Pointer


 To turn on mouse keys turn off numlock and press ctrl+shift+numlock. Now a small icon will appear in the task bar. Double click on that icon and change the settings as you want. After changing the settings press numlock again to turn on mouse keys and use your numeric keypad to move the mouse pointer as you want.

How To Effectively Use Mouse Keys

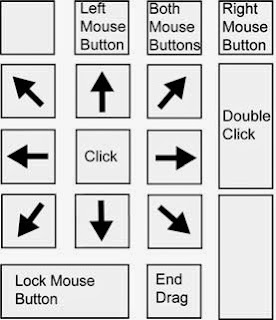
To effectively use mouse keys to control mouse pointer, see the image given below:
Mouse keys
The image given itself explains how you can use numeric keypad on your keyboard to control moue pointer. Please watch the video tutorial below to understand better.
Posted by John Peter on 01:58 | No comments | Categories:

Thursday 14 November 2013

Some Programs consume your entire computer resources. Some Programs that needs internet connectivity consumes entire bandwidth.Many download applications, for example, use as much of your connection as they can. What if you're running more than one at the same time? Net Limiter lets you restrict certain applications' bandwidth usage so more important ones get priority. Using the straightforward interface, you can instantly view connections and stats and even apply different limitations at different times of day.
For example, you might allot more bandwidth to download managers and file-sharing programs at night. Our only quibble is the program uses too much memory (12 MB).
You can monitor network traffic and specify download and upload transfer rate limits for apps easily. It mainly caters to advanced users, such as network administrators.

Posted by John Peter on 03:29 | No comments | Categories: ,

Webmaster tools now has fetch as Google feature. With this feature you can index your URLs to Google in less time.After submitting URL for fetching, Google bot crawls the URL,Within few hours, your URL will get included in Google index. But, Google doesn't guarantee that they will index every URL you submit.They uses the same process for indexing URLs by fetch as Google and those URLs that are discovered by Google bot naturally. The only difference between them is fetch as Google is much faster than normal one.This new functionality is very useful if you have created a new website and you want to index it very quickly or if you have added some new pages in your website and want them to appear in search results. you can also submit URLs that are already indexed o Google to refresh them and re index them. This new functionality is superb improvement in Google webmaster tools.

How to submit a URL

To know how to submit a URL to Google index, please watch the video tutorial given below. For submitting a utl, you need to have a Google webmasters account and a verified site. From Google webmaster tools you can easily fetch your URLs and put them to index on Google.

Submit a Public URL to Google

You can also submit a URL for indexing even if you don't have verified your site or even if you don't own a site. For adding a Public URL to index on Google, visit crawl URL form.

Google bot is already very good in finding new URLs but, it takes some time to index new URLs on Google. But if you want to speedup this process then i would recommend you to use fetch as Google feature in Google webmaster tools. Watch The video tutorial given to know how to use fetch as Google to effectively index you URLs in less time.
Posted by John Peter on 01:04 | No comments | Categories: ,
Limitations Of Blogger Account
Blogger is free blogging service owned by Google.Blogger is one of the favorite blogging platform of all time. There are millions of active users that prefer to use blogger instead of word press. perhaps there are some limitations on this free blogging platform. You must consider these limitations seriously before starting your blogging career. Here I'm posting some limitations of using blogger account (blogger blog). Here is some information about the limits a Blogger account.


1.Blog Title limits:
You can use only 90 characters for your main blog title.

2.Number of Blogs:
You can create 100 blogs. If you exceed that limit then you will get in trouble, they will restrict the access to your blog. So keep i mind not to create more than 100 blogs.
3.Bandwidth Limit of Blogger Blog:
There is no bandwidth limit for a blogger blog.

4.Number of Posts:
There is no limit to the number posts you make. You can make infinite number of posts. You can make more then thousands of blogs in just one day but, after posting 50 blog posts a captcha  image is shown up to check that you are not a robot.This limitation can be removed by contacting blogger team.

5.Blog Authors:
You can't add more than 100 blog authors.
Number of Labels:
You can create 5000 labels per blog. You can add 20 unique labels on a single blog post.

6.Size of Pictures:
Blogger gives you one GB of free image hosting. If you are uploading an image via your mobile or smartphone then it should not be greater than 250 k in size.

7.Length or Size of Posts:
There are no limitation on length of a post, but make sure that you are not exceeding size limit of 1 Mb.

8.Number of Static Pages:
You can't create more than 20 static pages in blogger. Perhaps there is a trick to create more than 20 static pages.

9.Storage Limit of Picture:
Unfortunately you can upload only 1 GB images on your blog. Your blog and your picasa accounts are linked to each other.

10.Size of Pages: 
The main page of your site, the archive pages and the post pages are limited to 1 MB in size.If you exceed this limit then it shows up an error  "006 please contact Blogger Support”. You may need to decreasing the size of pages to remove this error.

11.Number of Comments:
There is no limit on number of comments.

12.Comment length:
 4,096 characters per comment.If you exceed this limit then comment will not get published.

13.Bandwidth Limit For image Hosting:
Your Images are hosted on pi casa so, there is not bandwidth limit for images.

14.Account Suspension:

Bloggers has strict rules. They can suspend your account if you violet their terms and conditions. If you do so then they can delete your entire Blogger account. After deleting your blog, your free blog spot domain is kept on hold and no one can use the same domain again. So make sure that you are not violating any of the terms and conditions.

15.Your Blog Is Not Yours:

Its true that you are not the real owner of your blog, because your blog is owned by Google, they have the rights do delete your blog without your permission. If you violet their privacy policies, then your blog will be no more. Make sure to backup your content.

These limitations can't affect your blogging career. There is no way to exceed these limits. We hope that some of these limits will be removed in upcoming days.
Posted by John Peter on 00:01 | No comments | Categories:

Monday 11 November 2013

Blogger VS WordpressToday we are going to talk about the most frequently asked question by newbies many times and some of them got confused to chose heir way. Either go with WordPress or go with blogger. Blogger and WordPress are the most popular blogging platforms in the modern era. There are millions of users on the internet using blogger and WordPress. But for a single author it becomes very difficult to say which one is better and has more potential than other one. However it has been discussed many times by professional bloggers and some of them recommend that WordPress is better due to its professional featureless and some of them recommended that blogger is better because it belongs to Google family. After couple of years blogger evolved, developed,  professionalized by goggle developer and now most of the pro bloggers highly recommend to use blogger because it is Search Engine Optimization friendly and it should be used for blogging.

Advantages of Blogger Over WordPress:

Template designing: That's the biggest advantage of a blogger template. In a blogger template, you can customize everything you want, from the <html> to </html> everything is customizable in blogger. this means that you can put add external css, add a meta refresh tag in your blog and millions of other things. So you can turn your template into a high quality professional template just by playing
Provides free hosting: Your entire blog is hosted on Google servers, no one can host your blog better than Google. Your entire blog means all the posts, images, blog template and all the widget codes are stored in Google data center. There is no bandwidth limit for a blogger blog. You can upload infinite images, Infinite blog posts on your blog. And the best thing its free.100% trustworthy servers: Blogger blog can't be hacked easily. The reason is already well known to you.Google is worlds best search engine and worlds no 1 ranked website.Your blog is hosted at Google servers so it can't be hacked easily.
Blog Speed: However we have personally received dozens of comments from WordPress user that why WordPress blog is taking more time in loading  page than Blogger Blog. There are many reasons. One of the best answer is that blogger blog is simply coded in XML/Html and Cascading style sheets while WordPress blog is created in PHP. So blogger will always one step forward than WordPress in this regard.

Which One Is Better For SEO

In the video given below, Matt Cutts explains which platform is better for search engine optimization
You already know that bloggers is Google platform so it will make blogger blog search engine optimization friendly for all popular search engines.
Blogger VS Wordpress
You might have heard that blogger template is fully prepared in Html/Css and XML so it becomes very easier to customize it template.Over 500 Million active users are using Blogger including some top brands like Twitter.Blogger uses widgets and plugins that help you to build a better and healthier site. It has a wide range of free Widgets inventory that enables us to add more spark to our site. There are some reputable developers like us who keeps on developing new widgets to keep this platform alive. You can access our Widget inventory or can even request us to develop any plugin that you need. Finally its up to you, make your final decision and comment below.
Posted by John Peter on 19:02 | No comments | Categories: ,
Generate Your Own Custom Hex Colors:
1. Drag the black bar on the "Hue" selector to generate the desired base color.
2. Next double click inside the Brightness/Saturation grid to activate the cursor. Drag it until the desired brightness is achieved.
The "Swatch" bar shows you the final color result.
3. The hex color code is generated at the bottom of the grid in the "Hex" box. Simply copy and paste the code into your page.
Next...Choose a Color Scheme!
Once you have your hex color value from the chart above, copy and paste it (without the #) into the form below the color wheel and it will generate a matching color scheme for your website.
This is a great tool to use if you're trying to come up with cohesive colors for your navigation, background, hyperlinks, etc.
Remember, it's best to choose 3-4 colors max and use them consistently throughout your website. It will make it look more cohesive.


Popular Hex Colors

#FFFFFF
#000000
#C0C0C0
#808080
#FF0000
#F0A804
#FFFF00
#008000
#0000FF
#800080


Posted by John Peter on 13:39 | No comments | Categories: ,


Meta+tag+generator+for+blogger+tricks+donor
Hi friends!  Now I am going to share with you a free meta tag generator tool for blogger. Meta description and meta keywords are the most popular html tags which are still recommended despite many arguments by several expert Search engine Optimizer. Some peoples who are not able to create meta tags so i think about meta tag automatic creator in this meta tag generator you only have to put your keywords, description, author name , etc and it create meta tags automatic.


Steps:
  1. write all necessary information in the boxes.
  2. then click on create meta tags & a warning is showed "are you sure".
  3. click yes then find the <Head> tag in your template.
  4. paste the tags below the <head> and save your template.
  5. its done


Description:
Keywords:
Author (Optional):
Robots (Optional):


Copyright © 2013  | All Rights Reserved Brain Of Computer
And if you liked this post, please like us on fbpage. Thanks!
Meta Tag Generator Tool by Tricks Donor
Posted by John Peter on 13:28 | No comments | Categories: ,
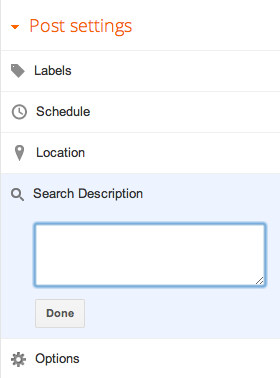
Search description for postsFor enabling search description to your blog you have to change some settings in your dashboard..When using a search engine (such as Google.com), you probably see a blurb of text underneath your search results that helps you decide whether or not that’s the site you want. For example: This is what appears when you search for “Blogger.”
The descriptive line of text that appears under the link is the search description.
If you don't specify a search description for your blog, search engines will establish one for you based on your blog’s content.
To create your own search description, just go to Settings | Search Preferences and click Editnext to "Description" to reveal a text field. Select Yes, write in your text, and click Save changes.

A few examples of blog search descriptions:

Settings to create a search description on Blogger
  • “A blog about social networking and web design.”
  • “A journal of my year in Paris.”
  • “Healthy southern-style cooking.”
Enabling this feature will display a “Search Description” option in the Post Settings panel that allows you to enter a search description for individual posts.
Posted by John Peter on 13:13 | No comments | Categories: ,
Email Subscription Widget For Blogger
Its time to make your Blog More stylish with this email Subscription Widget. Look at the screenshot given at the left side of t his post to better understand how the widget actually looks.This widget is developed in css3. This widget is made to boost the number of your email subscribers. For adding this code, just follow the simple steps given below. Before adding this widget to your blog, have a look at its features. I promise that this widget will never let you down and it will boost your email subscribers. This widget also provides Facebook, Twitter and Google plus and feed buttons along with email subscription widget.

Features of Email Subscriptione Widget


  1. Made with css3
  2. no java script no j query
  3. plain html and style sheet code
  4. no need to edit your template

How To Add Email Subscription Widget

Its very simple to add email subscription widget in you blog, just follow the simple steps given below.
  1. Go to your blog dashboard
  2. go to layout
  3. click on add a gadget
  4. Select html/java script
  5. paste the code given below inside.
<style>
.tbisubscribe {
border: 1px solid #56DB23;
padding-right: 8px;
padding-left: 6px;
padding-top: 8px;
padding-bottom: 8px;
width: 284px;
background: #EDFFFD;
}
.tbisubscribe:hover {
-moz-box-shadow: inset 1px 1px 10px 1px rgba(249, 215, 126, 1);
-webkit-box-shadow: inset 1px 1px 10px 1px rgba(249, 215, 126, 1);
box-shadow: inset 1px 1px 10px 1px rgba(249, 215, 126, 1);
}
.tbimailbox {
border: 1px solid #D3D3D3;
-webkit-border-radius: 4px;
border-radius: 4px;
-moz-box-shadow: 1px 1px 1px 1px rgba(255, 172, 84, 0.4) inset;
-webkit-box-shadow: 1px 1px 1px 1px rgba(0, 0, 0, 0.4) inset;
box-shadow: 1px 1px 1px 1px rgba(0, 0, 0, 0.4) inset;
color: #666;
font: 14px "trebuchet ms", sans-serif;
padding: 7px 15px;
width: 140px !important;
-webkit-transition: all 0.5s ease-in-out;
-moz-transition: all 0.5s ease-in-out;
-ms-transition: all 0.5s ease-in-out;
-o-transition: all 0.5s ease-in-out;
transition: all 0.5s ease-in-out;
}
.tbisubmit {
font: bold 12px Tahoma, Geneva, sans-serif !important;
font-style: normal;
color: #ffffff !important;
background: #ff5714 !important;
border: 0px solid #ffffff !important;
text-shadow: 0px -1px 1px #222222;
box-shadow: 2px 2px 5px #000000;
-moz-box-shadow: 2px 2px 5px #000000;
-webkit-box-shadow: 2px 2px 5px #000000;
border-radius: 10px 10px 10px 10px !important;
-moz-border-radius: 10px 10px 10px 10px;
-webkit-border-radius: 10px 10px 10px 10px;
padding: 8px 15px !important;
cursor: pointer !important;
margin: 0 auto !important;
height: 45px !important;
}
</style>
<link href='http://fonts.googleapis.com/css?family=Oswald' rel='stylesheet' type='text/css' />
<div class='tbisubscribe'>
<div style='color: #666666; font-weight: bold; font: 22px Oswald, cursive; margin: 0px 0px 10px 15px;'>Get Free Updates in your Inbox</div>
<div style='margin: 10px 0 0 6px;'>
<form action='http://feedburner.google.com/fb/a/mailverify' class='emailform'
method='post' onsubmit='window.open(&apos;http://feedburner.google.com/fb/a/mailverify?uri=brainOFComputer&apos;, &apos;popupwindow&apos;, &apos;scrollbars=yes,width=550,height=520&apos;);return true'
style='margin: 0pt;' target='popupwindow'>
<input name='uri' type='hidden' value='brainofcomputer' />
<input name='loc' type='hidden' value='en_US' />
<input class='tbimailbox' name='email' onblur='if (this.value == &quot;&quot;) {this.value = &quot;Enter your email...&quot;;}'
onfocus='if (this.value == &quot;Enter your email...&quot;) {this.value = &quot;&quot;}'
type='text' value='Enter your email...' />
<input alt='' class='tbisubmit' title='' type='submit' value='Subscribe'/>
</form>
</div>
<div style='border: none; color: #666666; font: 22px Oswald, cursive; margin: 25px 0 0 5px;'>Follow us on:</div>
<div style='margin: -32px 0 0 120px;'>
<a href='https://www.facebook.com/brainofcomputer' target='_blank' title='Join us on Facebook'><img src='https://blogger.googleusercontent.com/img/b/R29vZ2xl/AVvXsEi3a7JLoVAt_Ywmm10vcWJtSmq4g3cRxF5_uRiP_reXES5e0DDrcVSVyCDRnoNlK-nqNbQvlipDQUoWMZGllXJmBXyseYNV7g8P5cE-W2xsejBhO80-uy3pKcAkcHh-hIJrFqWQXz9xP2s/s32/facebook500.png' alt='facebook'/></a>
<a href='https://www.twitter.com/brainofcomputer' rel='nofollow' target='_blank'
title='Follow us on Twitter'><img src='https://blogger.googleusercontent.com/img/b/R29vZ2xl/AVvXsEjvPqPjJJ82fBQRqPzEskei9Xt1xeF4QfWXv5IS7qrZZUvoBww2VNBVRBNHbuuAONrxRLblRJWnwkO-u_SodQGHu8fCB_GKfRPwfjKh81k-9de9uS7KKcBgiM6ijeQXol1MHfxMpJgGAVM/s32/twitter.png' alt='twitter'/></a>
<a href='https://plus.google.com/102309133279826094256' rel='nofollow' target='_blank'
title='Follow us on Google+'><img src='https://blogger.googleusercontent.com/img/b/R29vZ2xl/AVvXsEiwjDhVqcaQam8GKu2B0F9jnJm8qRoCem6kN2qB1gAlRDHMs0eFaGk7AMDVDQ5dlfONhRJ9DH0TfyWQED5W0d3Dxn3HQ4oYK8SOI0IsB7g-6qpPPB4llqAjLcjHpl7c9QsPbbdZZ5J5LWE/s32/googleplus-revised.png' alt='gplus'/></a>
<a href='http://feeds.feedburner.com/BrainOfComputer' rel='nofollow' target='_blank'
title='Subscribe to RSS'><img src='https://blogger.googleusercontent.com/img/b/R29vZ2xl/AVvXsEjwjBOWVsm2sAjm4RsryGYqfkLOxgXkarBubdsGCeDT6n0R5ruKSsbirelLSUJaNfEJbg3MQXJrtpkvUMGn6Zu5wS9jmlni_1yPrSqgRY3oIX7q0Fb2kPo3mCP198z5ky9rDbPStPxPJgo/s32/rss.png' alt='rss'/></a>
</div></div>

Make sure to change highlighted codes. Now save the widget and you are done. Leave your comments below.
Posted by John Peter on 12:07 | No comments | Categories: ,

Saturday 9 November 2013

image
The more page views you get, the better will be your search engine rankings.Engaging your readers is nothing but how many pages a single user visits on your blog at a time. Page views are definitely not among the first of your worries, because the initial months are busy in setting up the blog, tweaking the design, getting people to know about your new blog and so on. Many newbie bloggers are even unaware of Google analytics code and get it installed quite later. But unfortunately many bloggers fail to achieve this, which results in a higher bounce rate. In this post i will share some of the best tips that will help you to keep your readers engaged and kick you blog page views like a sky rocket…

 What Are Page Views?

Page views are an important measure of the traffic received by your site and denotes the requests sent to the server to load that page. In simple terms it denotes the amount of times a page gets viewed.

How Do You Track Page Views?

Well the easiest and simplest way to keep a count of page views that your blog or site receives is to use Google analytics. You will need to set up a free account and then input your site details and get a tracking code.
This code needs to be installed on your site and verified. Once it is verified, you will start receiving free info about the number of page views and many other important criteria in your Google analytics report.

Difference between Page Views and Unique Page Views

Okay so now you know about page views. But if you have looked at your Google Aanalytics reports closely, you might have noticed an additional kind of statistics called as unique page views. Unique page views denote the number of times an individual visitor has viewed your page. No matter how many times he/ she tries to load the page, only one unique page view will be calculated.
Unique page views reflect the real picture about your traffic, but page views are considered more important.

Why Are Page Views Important?

Page views are important in more ways than one. First of all let us speak about advertisers. Google adsense is the most popular form of advertising, especially for beginner bloggers. Google adsense earnings are based on page views and clicks. So more page views obviously translate into more adsense earnings and that is something every blogger is looking forward to.
It is a good thing to increase page views even if you are not looking at the monetary aspect. More page views mean more reader engagement and that is something that every blog and its owner should aspire for. More page views will reduce your bounce rates and a low bounce rate is another benchmark for good blogs.

How to Increase Page Views?

By now you have understood the importance of getting more views per page and are desperate to learn techniques that increase page views. Here is a comprehensive list of methods that actually work and are super easy to implement as well:


1. Great Content

This is the most simple and important thing to remember if you want to increase your page views. If the reader likes your article, he will obviously stay on your blog for more than 5 minutes browsing digging your blog. Useful, original and interesting will always leave your readers hungry for more. So it time that you should work out on your blog, writing quality content for your readers. Its simple, you give the readers, and the readers will give what you want.

2. Excerpts on Homepage.
You might have seen many blogs which shows full post on the homepage. I really don’t like these blogs because I have to scroll all way down to find whats more ahead. This will gradually decrease your page views. Showing excerpts are the best way to increase page views and manage post on the home page highlighting multiple posts.

3. Create Catchy Titles.
Make sure you create a catchy article which grabs your reader attention and force them to read the whole article. Its also important if you are showing excerpts on your homepage or front page. Eye grabbing titles are more viewed both on site and of site if shared them on twitter, facebook and others

4. Interlinking.
Interlinking means to link you previous articles with the current one. Now there are two advantage of interlinking. First it would help you to rank your articles higher in search engines, as interlinking works like a vote to the article. And second one would keep your readers engaged with your blog. If you are writing something that relates to the previously written article, just link to them. For example, you can see above how I linked to my previous article.


5. Improve Load Time.
You might not wanna overlook this section. Because loading time plays an important role for page views. The less loading time your blog takes, the more page views you get. And the more load time it takes, the higher will be your bounce rate. A reader will quickly bounce of the page if the page doesn’t loads in no more than 7 secs. So its important that should also work out on your blog HTML and CSS for more page views.


6. Search Box.
This is an important element for any bloggers blog. The search box should be placed where its easily viewable to the readers like at the top navbar or at the sidebar. The Search box helps your readers to find and locate your previous articles on your blog in turn increasing your page views.


7. Easy Navigation
Make sure your blog is easy to navigate. Don’t confused your readers with confused links all over the blog. Some of your readers might be interested to dig your blog and look for other interesting articles. Display your blog categories in the navbar, add tags cloud, display blog archives as hierarchy. Make sure you do create an optimized sitemap or a archive page where you show all your A-Z post.


8. Categorize your Article.

This is the most important aspect if you are a blogger user and displaying related post below your article. As you know blogger allows you to categorize your post by using labels only. You would mess up your article and blog if you use more than 2 or 3 unrelated labels.
For instance if you have written an article on Health and Fitness and you have labelled it with “health” and “astrology“, this would display articles related to health and astrology too. Now why a reader would be interested to read an article on astrology if he wants to read more health related articles.
So its important that you categorize your post with a single label or a two at most, related to the first one. This might not be a problem with WordPress users. You can automatically generate related post with the plugin.

9. Display Related Post
You might have read this many times, but this is the most common practice to keep the reader engaged to your blog. If the reader reads your full post from start to end and finds your article more interesting, he/she will surely click on one of the related post below the post. As you can see below I have added the related post widget which shows 4 related articles to this topic. Don’t display more than 5 articles, this might irritate the reader seeing a huge list of related links.

10. Featured Post.
Readers are most likely to visit those pages which are most popular or the most commented on a blog. You can show your popular articles or the most commented articles in your sidebar, or as a jquery slider on the homepage. Its also important that you should keep these post optimize for more page views.
Posted by John Peter on 16:47 | No comments | Categories: ,
Best Widget To Make Your Sidebar Header More Stylish
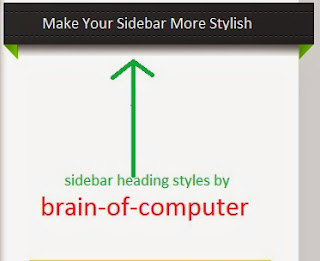
We have developed another code in css3 to make your sidebar more stylish. This widget is designed in css3. This lightweight widget will give your blog a stunning look. This widget changes your sidebar h2 styles into highly optimized and stylish sidebar h2. This widget adds a separate style on sidebar h2, The background image used in the style sheet is very small in size and it is hosted on picassa so you don't need to worry about server errors and image loading time. Another great thing is you don't need to add separate html codes in your blog. This widget works perfectly on sidebars having 320 px width so, make sure that your sidebar width is in between 300 to 320 px.

FEATURES OF Sidebar Header Styles

  1. Highlight Your Sidebar Header
  2. It doesn't affects your page loading time 
  3. No Java script no j query
  4. Plain style sheet code designed in css3
  5. No need to add extra html codes in your blog
  6. Eye catching look

How To Add New Sidebar Styles In Blogger Blog

For adding this widget in your blog, Proceed as follows:
  1. Go to blogger.com
  2. Open Your Blog.
  3. Go To "Template".
  4. Click "Edit HTML".
  5. Now, Search For "]]></b:skin>" 
  6. Add the code given below above "]]></b:skin>"

Read: How To Add Contact Us Page To Your Blogger Blog

    .sidebar h2 {
    background: url(https://blogger.googleusercontent.com/img/b/R29vZ2xl/AVvXsEiBuRjO89A_WhnW6vd1L7NF1asc9S2EGARg0d9gaQGNqvlNmp_1TDY8BaMLpFuZTDvUtVKg-jVVBWxvbJiUN2x2uV3S9pl5lMu5bvyIINxmo6gzo_KCKvJr-fOhvDzPU8BMa-1eTHMtl6Gi/s400/sidebar2_h2.png) no-repeat scroll 0 0 transparent;
    color: rgb(213,213,213);
    height: 66px;
    font-size: 14px;
    font-weight: bold;
    margin: 0 0 -28px;
    position: relative;
    left: -30px;
    top: 0;
    width: 362px;
    text-align: center;
    padding: 15px 0 0;
    font-family: helvetica;
    padding-bottom: 15px;
    }
    You may need to change the value of highlighted code to align the sidebar heading correctly Comment your questions below and let us know!

    Read: How To Add New and Old Ribbon To Latest And older Posts

    Posted by John Peter on 12:26 | No comments | Categories: ,
    How To Add PHP Codes In Blogger Blog
    This post will guide you to add a PHP file on blogger. PHP is one of  the most powerful language used for web developing. After reading this  tutorial, you will be abel to add these powerful codes in your blogger blog. Blogger is one of the most powerful blogging platform. But, still you can't host files using blogger. For hosting files you need to use a hosting service like host gator or you can also use Google drive for hosting files. You can also use google app engine to host your files.

    1: Creating a PHP File:

    Before you can add PHP Codes in blogger, you have to first create a PHP file in which you have to use all the PHP codes that you would like to use.  However, make sure that the file is free from errors otherwise things would not look good. Following is the simple Hello World PHP code example, just for a basic guideline for some beginners

    <?php
    echo '<p>Hello Brain</p>';
     ?>

    After creating the file with all your desired codes make sure you save it in .PHP extension. For example, mybloggerlab.php, you can use NotePad++ for writing codes because it is the only FREE standard developing tool.

    2:Hosting a PHP File:

     Blogger does not allow you to host any kind of files like PHP, HTML or CSS. Therefore, you have to either host it on your hosting (if you have) or you can use Google Drive to host them for FREE. We have already written a detailed tutorial on It, so read it here.

    Read: How To Host Webpages On Google Drive

    You can also use Dropbox, and many other free hosting services but certainly they are not better than the features and reliability of Google Drive.

    Which Free Hosting Service You Should Use To Host PHP Files

    We recommend you to use Google drive or Google app engine. We already have posted a blog post on hosting files at Google drive and Google app engine. The main difference between Google drive and Google app engine is that the file hosted on Google app engine loads little bit faster than Google drive. If you host your files on google app engine then your files will load little bit faster than Google drive. You can also use dropbox 

    Read: How To Host Css Files On Google Drive

    PHP is considered as the most powerful computer language that makes things happen with the glimpse of seconds. However, PHP is not supported by Blogger or BlogSpot running platform which makes it extremely difficult to customize and implement some new latest developments, but there are still some ways through which you can add PHP codes in your Blogger enabled Website. Though, the results are not 100%, but it is far better than not having a PHP code on your blogger site. In this article, we will show you how to add PHP codes in Blogger.

    3:Adding  PHP Codes in Blogger

    After creating and hosting the PHP file, login into your Blogger account. Once logged in, select the blog on which you would like to add PHP Codes. Now it depends on your needs whether you want to add the PHP code in posts, pages, sidebar or footer. Just paste the following code anywhere you would like to display the PHP file.
    <object width="400" height="300" type="text/html" data=" your-file.php"></object>
    Don’t forget to replace your-file.php with the URL of your own PHP file that you may have got while hosting it on services like Google Drive Dropbox and etc.Go and check your blog to see if things are working or not Still, this is not the most accurate way because we are just using a iFrame technique to include the codes.

    Read: How To Host Java Scripts On Google Drive

    Posted by John Peter on 11:54 | No comments | Categories: ,

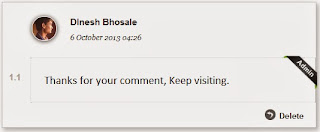
    Highlight Author Comments With Admin Ribbon In BloggerHere we comes with another ribbon! recently we have published a code to highlight new and old posts on home page with a new, old ribbon and now in this post I'm going to tell you how to add "Admin" ribbon on author comments. See the screenshot for better understanding. For adding this code you just need to add a single style sheet code in your template. This ribbon will give your comments an eye catching look. This ribbon will give your comments a bright look.  The Admin image given in the screenshot is uploaded on picassa so you don't need to worry about the image loading time and server errors. Lets proceed to add this ribbon in your blog

    Features Of Admin Ribbon

    Highlight Author Comments With Admin Ribbon In Blogger
    1. It doesn't affects your page loading time 
    2. No Java script no j query
    3. Plain style sheet code designed in css3
    4. No need to add extra html codes in your blog
    5. Eye catching look

    How To Highlight Author Comments With Admin Ribbon In Blogger Blog

    For highlighting admin auther comments, you just need to add a simple stylesheet code in your blogger template.
    1. Go to blogger.com
    2. Open Your Blog.
    3. Go To "Template".
    4. Click "Edit HTML".
    5. Now, Search For "]]></b:skin>" 
    6. Add the code given below above "]]></b:skin>"
    .comments .comments-content .icon.blog-author {
    position: absolute;
    top: 52px;
    right: -36px;
    margin: 5px 0 0!important;
    background: url(https://blogger.googleusercontent.com/img/b/R29vZ2xl/AVvXsEh_GZM7O2pgsj0UK4zvYtVtd9XLk6qa0NGWjeZBaUgJpLs2SGlS3TmCl8iYTZHR-KL-XzYV2cj6SCdtUB4zakWzVa5dIPFUip7LqXtFuC9bihUjxyy3A3OT6MJ5lGdocJdwN8CPczQBI7Eq/s320/aDMIN.png) no-repeat scroll 0 0 transparent;
    width: 90px!important;
    height: 90px!important;
    }
    Save your template and you are done. Sometimes the Admin ribbon doesn't gets placed correctly, so make changes in the highlighted codes given above to place the ribbon correctly. 
    Posted by John Peter on 11:14 | No comments | Categories: ,

    Friday 8 November 2013

    Everyone Wants to make their blog stylish. Recently I developed a code to add new post and old post ribbon in blog posts. This ribbons will make your homepage more stylish. These ribbons are developed in css3. Everyone wants to make his blog more stylish then anyone else and for that he add so many codes and widgets that will make him so bad that none of other is. So the simple rule is that you have to use that code which is best for user's eyes and mind too. Means that it should not to be so heavy and must should be awesome. In the way to find these type of code we are keeping our journey running and we are creating new codes with lot of features and 0% cons. So this is also a part of these codes that we are going to share in this article below. See the Screenshots given below to understand how does the ribbon looks after adding the codes.
    new old ribbonnew old ribbon
    Before adding this code, have a look at its features given below:

    1.) Pure HTML Code.
    2.) No JQuery Or JavaScript no worries!!!
    3.) Quick To Load and Easy To Install.
    4.) Will Not affect Your Blog Loading Time
    5.) Two Ribbons Are Hosted On Picasa About 2-3Kb/Image.
    6.) Blogger Official Conditional Tag Used.
    7.) Fully Customizable.
    8.) New Ribbon On Latest/Recent Post Of Your Blog.
    9.) Old Ribbon On Your All Old Post Automatically.
    10.) It Will Repeat Only on your home page.
    Now lets begin to add this ribbon.

    Adding the Ribbon Style Codes In Blogger Blog

    1.) Go to blogger.com
    2.) Open Your Blog.
    3.) Go To "Template".
    4.) Click "Edit HTML".
    5.) Now, Search For "]]></b:skin>" 
    6.) Add the code given below above "]]></b:skin>"
    /*########new old ribbon styles by brain-of-computer.blogspot.com start ########*/
    .brain-of-computer-new-ribbon {
    width: 56px;
    height: 56px;
    position: relative;
    left: 20px;top: -13px;
    float: right;
    background: url("https://blogger.googleusercontent.com/img/b/R29vZ2xl/AVvXsEh4O7tDc3BjtUU1M97m16xSwbJxp7Aio9kwi1UVHb0OAWjNFTyNSgRXYPQLBVafK_TZRYkQPaHB7uJXhjKiUQtXGAdArQvzSz2VDLmgBAKWmtnGDVXiyAcDcerlG0TJn-dI2W9EYIwMvafe/s400/New.png") no-repeat scroll 0% 0% transparent;
    }
    .brain-of-computer-old-ribbon {
    width: 56px;
    height: 56px;
    position: relative;
    left: 20px;top: -13px;
    float: right;
    background: url("https://blogger.googleusercontent.com/img/b/R29vZ2xl/AVvXsEjYUzTa3uRVXGxRWWkmqW2azfDzyIJtxrE6BhFImkwjbQux26SVFZtBUHWY1jMbLM7RYltPVjfc_9rZ33k2NEYU4Eptz3XMtldNYbPqj9Tos9c54vjEZkxMBd6Q9HaF3Nk6rg95G5kTFnIQ/s400/old.png") no-repeat scroll 0% 0% transparent;
    }
    /*########new old ribbon styles by brain-of-computer.blogspot.com end ########*/
     You may need to change the left margin to align the ribbon correctly.
     7.) Add the code given below above "</head>" tag
    <!--ribbon codes by brain-of-computer.blogspot.com-->
    <b:if cond='data:blog.url != data:blog.homepageUrl'><style>
    .brain-of-computer-new-ribbon  {display: none !important;}
    .brain-of-computer-old-ribbon  {display: none !important;}
    </style></b:if>
    <!--ribbon codes by brain-of-computer.blogspot.com->
     8.) Save your template

    Adding the Ribbon HTML Codes In Blogger Blog

    1.) Go to blogger.com
    2.) Open Your Blog.
    3.) Go To "Template".
    4.) Click "Edit HTML".
    5.) Now Search For <div class='post hentry uncustomized-post-template' itemscope='itemscope' itemtype='http://schema.org/BlogPosting'> 
    6.) Now Add The Code given below after <div class='post hentry uncustomized-post-template' itemscope='itemscope' itemtype='http://schema.org/BlogPosting'>" code.

    <!--########new old ribbon by brain-of-computer.blogspot.com start ########-->
    <b:if cond='data:blog.url == data:blog.homepageUrl'>
    <b:if cond='data:post.isFirstPost'>
    <span class="new1"></span><b:else/><span class="old1"></span></b:if></b:if>
    <!########new old ribbon by brain-of-computer.blogspot.com end ########-->
    If you couldn't find <div class='post hentry uncustomized-post-template' itemscope='itemscope' itemtype='http://schema.org/BlogPosting'> code then search for "post hentry" only, there may be two "post hentry" codes in your blog. Add the ribbon html code after "post hentry" code in your entire template.
     7.) Save your template
     Now visit your blog and see if it is working or not.

    Copyrights

    These codes are created by brain-of-computer and if you want to share this codes, then you may not remove the credits from it. If you are a genius blogger then you will not remove the credits.
    Posted by John Peter on 19:51 | No comments | Categories: ,
    Powered by Blogger.

    Blog Archive

    Blog Archive

    Bookmark Us

    Delicious Digg Facebook Favorites More Stumbleupon Twitter

    Text Widget

    Sample Text

    Download