Thursday 31 October 2013


This post will tell you how to use Google underwater search interface.On April fools day in the year 2012, Google China introduced the Google underwater image search. Watch the video given below to know how to use Google underwater image search. This search interface will never let you down. Just input your queries and click on on search and all the images related to your queries will fall in front of you. This gives your image search a new look. Before using this cool search trick, please watch the video given below to see how cool it is.
Wednesday 30 October 2013

In this blog post, I'm going to tell you how to add a YouTube video player plugin in your blogger blog. There are many reasons to do this, the first reason is to increase video views to become more popular on YouTube, the second reason is o gain subscribers on YouTube. So this widget is very useful for a video blogger. For applying this widget, you must know your YouTube video ID. also you need to upload the video on YouTube in order to preview it on blogger.
Read: How To Find YouTube Video ID
see the image given below to understand what is video ID and where to find it. In your video URL it is placed at "www.youtube.com/watch?v=Video-ID" it is generally a 10 digit code.

How To Add the Widget Code
<div dir="ltr" style="text-align: left;" trbidi="on">
<div class="separator" style="clear: both; text-align: center;">
<object class="BLOGGER-youtube-video" classid="clsid:D27CDB6E-AE6D-11cf-96B8-444553540000" codebase="http://download.macromedia.com/pub/shockwave/cabs/flash/swflash.cab#version=6,0,40,0"
data-thumbnail-src="http://img.youtube.com/vi/Video-ID/0.jpg" height="345" width="615"><param name="movie" value="http://youtube.googleapis.com/v/DyCcFi3bdok&source=uds" /><param name="bgcolor" value="#FFFFFF" /><param name="allowFullScreen" value="true" /><embed width="615" height="345"
src="http://youtube.googleapis.com/v/Video-ID&source=uds" type="application/x-shockwave-flash" allowfullscreen="true"></embed></object></div>
</div>
In the code given above, replace Video-id with your desired video-ID, width and height to the desired width and height you want. After replacing add this code as a html/java script anywhere in your blog layout.
 In this blog post I will tell you how to host java script on Google drive. There are many reasons of hosting java script on Google drive. hosting java script on external websites having good bandwidth and download/upload speed increases the page loading speed. After hosting your files on Google drive, you will notice that You can use the same method o host java scripts and php files on Google drive. Some days ago, I’ve posted a detailed video tutorial on hosting a webpage on google drive. Google drive gives you very huge storage space to store your files. You can store many files on your Google drive. For hosting a java script file on google drive you need to have a java script to host and a google account. If you these things then follow these simple steps given below:
- Recommended: How To Host Webpages On Google Drive
1.Create a .txt File
you must create a text file of your java script, for creating a text file you can use notepad. Copy the java script code in notepad and save it as a .txt file. Remember!!! .txt extension is most important, if you save the file with .js extension then the code will not work. you can use notepad word pad or any other word processor. After pasting the code, save it with .txt extension2.Uploading the Text file
After preparing text file for your java script code, you need to upload it on Google drive. Visit Google Drive and click on upload. then select the text file that we have created in the previous step.
After uploading the file, click on share

After that, you have to change the privacy settings of the file, change privacy settings to public so the everyone can access the file.


The second thing that you need to do is to note down the file-id of the file. It is placed in between ".....file/d/" and "/edit......" see the link given below.
https://drive.google.com/file/d/FILE-ID/edit?usp=sharingPut your file id in the link given below
if your website uses http protocol, then use this code
http://googledrive.com/host/FILE-IDIf your website uses https protocol then use this code
https://googledrive.com/host/FILE-ID
3.Adding The External java script Link In Your Html
after completing above steps, you need to paste the external java script link inside your main html. you can do this with the code given below:<script src="JavaScript_file_link"></script>
Replace the java script file link with the link that we created in the previous step, after replacement the link looks like
<script src=“http://googledrive.com/host/FILE-ID”></script>
Now put this code in place of your java script code in the html. now the java script code is hosted on Google drive .
Recommended: How To Host CSS On Google Drive
In this blog post I will tell you how to host css on Google drive. There are many reasons of hosting css on Google drive. hosting css on external websites having good bandwidth and download/upload speed increases the page loading speed. After hosting your files on Google drive, you will notice that You can use the same method o host java scripts and php files on Google drive. Some days ago, I’ve posted a detailed video tutorial on hosting a webpage on google drive.Google drive gives you very huge storage space to store your files. You can store many files on your Google drive. For hosting a css file on google drive you need to have a css to host and a google account. If you these things then follow these simple steps given below:
Recommended: How To Host Webpages On Google Drive
1.Create a .txt file
you must create a text file of your css, for creating a text file you can use notepad. Copy the css code in notepad and save it as a .txt file. Remember!!! .txt extension is most important, if you save the file with .css extension then the code will not work. In your blogger blog your css code is in between “<b:skin><![CDATA[“ to ”]]></b:skin>” tags and from <style> to </style” tags.You can use notepad word pad or any other word processor. After pasting the code, save it with .txt extension

2.Uploading the Text file
After preparing text file for your css code, you need to upload it on Google drive lets do this! Visit Google Drive and click on upload. then select the text file that we have created in the previous step.After uploading the file, click on share
After that, you have to change the privacy settings of the file, change privacy settings to public so the everyone can access the file.
The second thing that you need to do is to note down the file-id of the file. It is placed in between ".....file/d/" and "/edit......" see the link given below.
“https://drive.google.com/file/d/FILE-ID/edit?usp=sharing”Put your file id in the link given below
if your website uses http protocol, then use this code
“http://googledrive.com/host/FILE-ID”If your website uses https protocol then use this code
“https://googledrive.com/host/FILE-ID”
3.Adding The External CSS Link In Your Html
after completing above steps, you need to paste the external css inside your main html. you can do this with the code given below:<link rel="stylesheet" href="CSS_file_link"/>
Replace the css file link with the link that we created in the previous step, after replacement the link looks like
<link rel="stylesheet" href=“http://googledrive.com/host/FILE-ID”/>
Now put this external css code in place of your css code in the main html, now the css code is hosted on Google drive .
Recommended: How To Host Java Scripts On Google Drive
 Sometimes, you come to a situation where you want to hide specific posts in your blogger blog or to add a different style to a blog post or anything else that will be applied to that blog post only, then you have to find its “post ID”. Post ID is unique for every blog post and it can be easily found with the help of steps given below:
Step 1: Go to your Blog Dashboard
Visit Blogger Home, then go to your blog dashboardStep 2: Click On Posts
Click on post and then select your post

Step 3: Click on Edit
After selecting your post, click on edit.
Step 4: Search for “postID” in the URL of the edit page.
After lcicking on edit, you will get redirected to a new page, this page is the edit page of the blog post. Now, you must search for “postID=xxxxxxxxxxxxxxxxxxxx” where “xxxxxxxxxxxxxxxxx” is your required post ID. generally it is a 20 digit code which contains numbers only.
I wish that it will help you in finding your post id, I have uploaded a video tutorial, watch the video tutorial given below, If still you are facing any problem in finding post id then comment your queries below.
 The first thing you need to login into your blogger account and go to Templates >> Edit HTML (be sure you have taken a backup of your template, it is a good practice in case something went wrong you can use the backup) and search for the following code. You will find the below code somewhere near the BLOG1 Code.
Method 1:
<div class="date-outer">Now correctly replace the above code with the following lines of coding by making sure you are exactly copying and pasting the right code. If you miss a single thing, then the code will not work and you may face some kind of errors.
<div class="date-outer"After pasting the above code, now it is up to you which blog posts you would like to hide from your homepage. Replace Your-Post-Link with the URL of you post that you would like to hide from your homepage. You can hide multiple posts by adding more URLS in <b:if condition/> tag.
<b:if cond='data:blog.pageType == "index"'>
<b:if cond='data:blog.searchQuery == ""'>
<b:if cond='data:blog.searchLabel == ""'>
<b:if cond='data:post.url == "Your-Post-Link"'> style='display:none;'</b:if>
<b:if cond='data:post.url == "ANOTHER POST URL"'> style='display:none;'</b:if>
</b:if>
</b:if>
</b:if>
>
Congratulations: Once everything is done, save the template. Now go to your homepage and test if things are working according to the plan. If you follow the steps correctly, we are certain it would work just fine.
Method 2:
Every post has its own unique ID, so if we are able to find that unique id we can obviously apply display:none; CSS to hide it from our homepage. We have already written a tutorial on how you can find ID of your posts, so before moving ahead read that tutorial here.Recomended: How To Find Secret Post ID of a Blog Post In Blogger
Once you got your Post ID, go to Blogger.com >> Template >> Edit HTML and search for the skin tag, and just above it paste the following CSS code. Rememeber. Do not forget to replace post-1234567 with your own Post ID which you would like to hide from your homepage.<style>We hope this tutorial, may have helped you in learning a few techniques through which you can hide a post from your homepage. Since, we have used display:none; css so the search bots will continue to index it as it is not completely removed from the source code of your website.
<b:if cond='data:blog.url == ... >
#post-1234567 {display:none}
</b:if>
<b:if cond='data:blog.searchLabel == ... >
#post-8903456 {display:none}
</b:if>
Given below is the video tutorial on finding a postID:

With the new YouTube subscribe button, video creators now have an easier way to gain subscriptions and grow their channel audiences even quicker. embedded YouTube subscribe button
There are three button options to select from:
1.Default (No Channel Avatar)

2.Full Layout (With Channel Avatar)- Light

3.Full Layout (With Channel Avatar)- Dark

These options are available for both free and paid YouTube channels.
Before its release, the only way anyone could subscribe to a YouTube channel was to go to YouTube directly. I can agree that the extra step was a bit annoying but now it can be avoided. HORRAY! We've seen a few YouTube widgets before and in all honesty, this one is my favorite by far. It's very similar to the Google Plus Follow widget button.
Add The YouTube Button To Your Website/Blog
This is the easy part. For all you who are not as tech-savvy, it's as simple as 1, 2, and 3. I will be using my personal blog channel for the sake of this tutorial since I'll be adding it to my blog anyhow.- Go To the Google Developers Website
- Under "Configure A Button" Enter the name of the YouTube channel you want to create a button for.
- You will need to then select your desired layout and theme.
- Copy the HTML code seen in the box under your button preview.
- Add code to your website's FTP client or platform widget. For blogs, add to blog post, sidebar, or blog coding. If need be, seek your website/blog designer to do so for you or ask for help. If you're a Blogger platform user like me, simply add a HTML widget to your layout and insert the code.
TIP: To center, add <center> at the beginning of the code and </center> at the end of the code.
embeddable YouTube subscribe button
That's it! Easy as slicing pie. Please note that if your channel is NOT a paid channel, do not attempt to create a paid subscribe button. No, you will not earn cash in that way. Still getting confused? watch the video tutorial given below: If it worked then leave your comments behind
Tuesday 29 October 2013
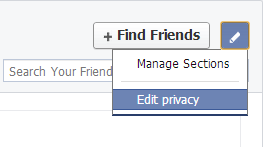
By default, anyone can see your friends list on Facebook. Its very easy to hide your friends list on Facebook and make it private, so only you can see it.Ever-changing Facebook can be difficult to keep up with, especially when some options seem to move from place to place over time. In the case of hiding your friend list in 2013, you may be trying to find this option in your privacy settings or account settings, but you won’t have much luck. If you want to hide your friend list, you have to start at the list itself. We’ve provided the simple steps below:
Step 1: Visit Your Facebook Profile.

Step 2: Visit the friends list page of your profile.

Step 3: Click on manage. then select edit privacy
Step 4: Change the friends list privacy settings to "only me"

DONE!!!
Watch the video tutorial given below to know more about hiding your friends list on your Facebook profile.

Find Your Facebook ID
In this blog post, I'll tell you how to find your Facebook ID.For finding your Facebook ID, you must visit your Facebook profile page. After visiting your profile page, note down the URL and mak some changes in it.
For example, suppose URL of your profile is
"https://www.facebook.com/username"
now, replace the "www." with "graph." after replacing,the URL looks like
"https://graph.facebook.com/username".
Now hit enter and you will see your Facebook ID as shown in the screenshot.
Video tutorial given below will help you to understand better.

CCleaner is the most popular and the best tool for keeping your Windows PC clear of all the unwanted and junk files, which starts to accumulate as your Windows installation gets older. It can even protects your privacy by clearing the cookies that track you. The startup manager lets you select the programs that run on system boot, which greatly improves the PC boot-up and makes your PC faster by decreasing the response time. But most people do not know what this small application is capable of, and they only use it to remove the temporary files from their PC. Below are all the amazing things you can do with CCleaner along with the best practices to do them.
LINK: Download CCleaner
Maintaining Windows PC With CCleanerBelow are the techniques and features to get the most out of CCleaner and use it to its full potential.
1. Removing Temporary And Obsolete Files
This is the primary function of CCleaner. The “Cleaner” tab is the default tab that opens when you run CCleaner and lets you remove temporary files that are no longer required by the system. Not only this, it also gives you options for removing app specific files. These are the files which apps create to open themselves fast but may consume space. It also allows you to remove cookies, history, cache and other saved files of the installed browsers. Removing them may protect your privacy but side-by-side slows down your web-browsing. The files it deletes may be used the next time you open a website, but if you delete those files, your browser will have to download a fresh copy of them.
2. Thumbnail Cache
The thumbnail cache feature of windows caches the thumbnails of images to open folders faster the next time you open the same folder. If you removes thumbnail cache, windows will have to re-build this cache and will take more time. It surely makes some free space but can cost you some speed.
3. Registry Cleaner
Register cleaners are not that helpful, which they often seem to be. Windows registry has hundreds of thousands of registry entries, cleaning hundreds or even a thousand at max will not bring a huge difference. Moreover, registry cleaners may delete some important registry entries, which can cause errors and can hamper in proper functioning of some programs.
Cleaning registry may give some privacy and some performance boost, but considering it’s possible harm, I recommend you to avoid it.
4. Uninstall Programs
CCleaner lists all the programs installed on your computer and gives you an easy way to uninstall them. The uninstall section looks exactly like the windows “Programs and Features” found in “Control Panel”, but here, you can also change the names on entries of installed programs for future reference. The uninstaller can be found under “Tools > Uninstaller“.
5. Manage Startup Programs
Most of the programs register themselves to start-up at windows boot. This is done so that they can load faster when you try to open them for the first time after the boot. But this slows down the windows boot and your PC takes more time while starting up. To manage the startup programs, navigate to “Tools > Startup” in CCleaner, and disable the programs you don’t use often. The more programs you disable, the faster will your computer start. You can also do this using MSCONFIG, the built-in configuration utility in Windows

6. Finding Duplicate Files
This is a great premium feature that CCleaner provides for free. You can find duplicate files from any specific location or the complete hard drive. The program even lets you delete the resultant duplicate files from its interface. You can match files by name and/or size and/or modified date. It can even skip system or hidden files on your demand. This is quite beneficial when you have big collections of music or video and you want to organize them and keep only one copy of any media file. This tool can be reached by navigating to “Tools > File Finder“
7. Managing System Restore Points
System Restore points are created when you install programs or windows updates. You can also create them whenever you feel like. They come handy when you encounter a problem with your windows installation and you want your machine to go back in time, to the configuration that worked fine. These restore points act as the checkpoints to which your machine can revert to. With CCleaner you can manage these restore points and delete the ones you think have become useless.
8. Wipe Data
When you delete data from your hard drive, only the pointers pointing to them are deleted. But the data remains on your hard disk. This data is never removed and is lost only when the location is over written by some new data. Until this, it can easily be recovered by any file recovery application. To stop this recovery and to protect your privacy, you can take benefit of the “Drive Wiper” feature of CCleaner. This is found under “Tools > Drive Wiper“.
You can choose any drive or even multiple drives at once and wipe their data. You have the option to wipe only the free space or to wipe all the files along with the free space.
Monday 28 October 2013
Download Windows 7 Boot Updater
Windows 7 boot upfater is a free software to update or edit the boot screen of windows 7.
Links to download windows boot updater:
http://www.softpedia.com/progDownload/Windows-7-Boot-Updater-Download-170593.html
http://windows-7-boot-updater.en.softonic.com/
http://windows-7-boot-updater.soft32.com/free-download/
http://www.downloadcrew.com/article/22540-windows_7_boot_updater_0011_beta
https://www.google.com/search?q=download+windows+7+boot+updater
Download Windows 7 Boot Screen
There are tons of free boot screens available to download from the internet.
Links to download windows 7 boot screens:
http://tchiro.deviantart.com/art/Pulse-blue-Windows-7-BootScreen-321869645
http://www.deviantart.com/?q=windows+7+boot
http://www.windows7bootscreens.com/
https://www.google.co.in/search?q=download+windows+7+boot+screens
report us when a link gets broken
.jpg)

We managed to get hold of a IDEA 3G connection as the operator has silently rolled out 3G services in Maharashtra. As you all might know , IDEA does not have a license in this circle and has inked a deal with Vodafone to offer 3G services here. Our test device was a desktop and the modem was D-link 7.2 mbps. Watch the video gicen above .
Its very easy to lock a folder without using a software, watch the video tutorial.Have you ever had the need for a protected folder, but didn't want to use Window's basic security? Then create your own!
Step 1: Create a new text file.
Step 2: pen the text file with notepad.
Step 3: Enter the source code given below in the text file and save it as locker.bat.
Given below is the source code of locker.bat
First time when you execute the bat file, it creates a new folder named "Private" , paste your files inside it. Now execute the file second time, Second time when you execute the file, it locks the folder. Third time when you execute the file it asks you the password to unlock the folder, default password is "password" . After entering the password, folder is unlocked.
Step 1: Create a new text file.
Step 2: pen the text file with notepad.
Step 3: Enter the source code given below in the text file and save it as locker.bat.
Given below is the source code of locker.bat
@ECHO OFFStep 5 execute the bat file,
title Folder Private
if EXIST "Control Panel.{21EC2020-3AEA-1069-A2DD-08002B30309D}" goto :UNLOCK
if NOT EXIST Private goto :MDLOCKER
:CONFIRM
echo Are you sure you want to lock the folder(Y/N)
set/p "cho=>"
if %cho%==Y goto :LOCK
if %cho%==y goto :LOCK
if %cho%==n goto :END
if %cho%==N goto :END
echo Invalid choice.
goto :CONFIRM
:LOCK
ren Private "Control Panel.{21EC2020-3AEA-1069-A2DD-08002B30309D}"
attrib +h +s "Control Panel.{21EC2020-3AEA-1069-A2DD-08002B30309D}"
echo Folder locked
goto :End
:UNLOCK
echo Enter password to unlock folder
set/p "pass=>"
if NOT %pass%== password goto :FAIL
attrib -h -s "Control Panel.{21EC2020-3AEA-1069-A2DD-08002B30309D}"
ren "Control Panel.{21EC2020-3AEA-1069-A2DD-08002B30309D}" Private
echo Folder Unlocked successfully
goto :End
:FAIL
echo Invalid password
goto :end
:MDLOCKER
md Private
echo Private created successfully
goto :End
:End
First time when you execute the bat file, it creates a new folder named "Private" , paste your files inside it. Now execute the file second time, Second time when you execute the file, it locks the folder. Third time when you execute the file it asks you the password to unlock the folder, default password is "password" . After entering the password, folder is unlocked.
Sunday 27 October 2013
 Submitting site is most of the important part of SEO. If you want to increase your SEO ranking and index your blog posts fast, then you must need to submit your sitemap in Google or Bing webmaster tools. As we know we can’t submit sitemap in Yahoo, because they remove the site explore option on November 2011. I saw some people submit their sitemap with wrong ways and who do it, they obviously facing too many problem about website. Problems like no visitors decrease SEO, not indexing blog pages, lost page rank, search engine position and many more. So today I decided to create a new post about how to submit sitemap with correct ways. It’s too easy for beginner, you just need to try.
- Firstly you need to visit Google webmaster tools and log in with your Gmail address.
- After the site complete loading, click the add site option (right side).
- Type your website link. Example: www.yourdomain.com and click continue button.
- Now you can see the verification page.
- Choose HTML tag option for verify your site. They will give you a code, copy it.
- Now log in your blogger account and go to Edit HTML tab.
- Paste the code after the <head> Tag. Now save your template and click the verify button in Google webmaster tools.
- Now your site is successfully verified. Time to submit site link in Google webmaster tools.
- Click crawl menu (left side of Google webmaster tools) and choose sitemaps option.
- Click Add/Test Sitemap menu (Red colour – Right side when you click sitemaps).
- Now follow all steps below.
atom.xml?redirect=false&start-index=1&max-results=500
Submit this sitemap if your blog have less than 1000 posts
atom.xml?redirect=false&start-index=1&max-results=500
atom.xml?redirect=false&start-index=501&max-results=500
Submit this sitemap if your blog have less than 1500 posts
atom.xml?redirect=false&start-index=1&max-results=500
atom.xml?redirect=false&start-index=501&max-results=500
atom.xml?redirect=false&start-index=1001&max-results=500
Hurray, you successfully did submitting your sitemap. Wait at least 2-3 days for crawl your whole page in search engine. Now I will show you the easiest way to submit your sitemap in Bing webmaster tools. Because Bing is also a most popular search engine like Google. You will get too many web traffic from Bing search engine, if you successful to put your site link there. I've seen some people submit their website in webmaster tools, but they got some crawl errors. So I will share the error free ways to submit sitemap. Let’s learn.
Submit sitemap in Bing webmaster tools:
- Firstly you need a live or Hotmail account for log in. If you have no, you can create an account.
- Go to Bing webmaster tools and sign in with your email address.
- After sign in, click the add site menu and put your site link. Example: http://www.yourdomain.com/
- Now you need to complete your webmaster profiles.
- Then you can see 3 different options to verify your website. Choose option 2.
- Now copy the Meta tag and paste it below <head> tag in blogger.
- Save your blogger template and verify your website in Bing. You will see verification complete.
If you have less than 500 posts in your blog, then copy the code.
http://www.bing.com/webmaster/ping.aspx?siteMap=http%3A%2F%2Fwww.brain-of-computer.blogspot.com%2Fatom.xml%3Fredirect%3Dfalse%26start-index%3D1%26max-results%3D500
If you have less than 1000 posts in your blog, then copy the code.
http://www.bing.com/webmaster/ping.aspx?siteMap=http%3A%2F%2Fwww.brain-of-computer.blogspot.com%2Fatom.xml%3Fredirect%3Dfalse%26start-index%3D501%26max-results%3D500
If you have less than 1500 posts in your blog, then copy the code.
http://www.bing.com/webmaster/ping.aspx?siteMap=http%3A%2F%2Fwww.brain-of-computer.blogspot.com%2Fatom.xml%3Fredirect%3Dfalse%26start-index%3D1001%26max-results%3D500
Note:
You must need to change the site URL.
Now paste only one code in your new browser tab and hit enter. You will see a message like this, Thanks for submitting your sitemap.
For Yahoo search engine:
You don't need to submit sitemap for yahoo. When you finish the bing webmaster steps, your site will appear in yahoo search engine.
Note (Yahoo requirement):
You must need at least 5 days after submitting sitemap in bing webmaster tools.
You blog must need at least 15 blog posts.
If you have any kinds of problem or need help about webmaster tools, feel free to comment here. I will try to solve your problem quickly. Thanks for reading my posts
 Android is a great OS in every sense, fully customizable, millions of free and paid apps, tons of launchers and availability of all the high-end games are some of its advantages. The only drawback you could find in Android is its battery consumption. If compared to the other operating systems, you could feel that the Android phones consume battery faster. So to solve this issue, we have some tips for saving battery on your Android phone. Follow the instructions givn below and turn your android device into an energy saver.
1. Display Consumes the Largest Part
Your mobile screen consumes a lot more power than any other application/process. Don’t toggle the display again and again. Try to keep the display off when your battery is low, this will make it last longer.
2. Reduce Screen Brightness
As screen consumes a lot of power, you must keep the brightness to the least level.
3. Stop Wireless Communication
Turn on mobile data, WiFi, NFC, Bluetooth and GPS only when you need them. All of these consume a lot of power and should be kept off all the time.
4. Give Preference To WiFi
If you can have access to a WiFi network, then you must use it instead of mobile data. Mobile data consumes much more power than WiFi and hence should always be avoided.
5. Turn Off Auto Sync
Most applications you install sync files with their servers after every set interval. The syncing process should be run manually and for only the app you want to sync data for.
6. Use a Minimum Number of Widgets
Widgets use power to be live and to display the changes. They are always working in the background. You should not use many widgets together.
7.Don’t Use Live Wallpapers
Live wallpaper are very power greedy and drain your Android mobile’s battery very fast. You should turn them off when you want to squeeze some more time out of your battery, or better, don’t use them.
8. Kill Applications Manually or Using Some Task Killer Application
When you leave an application, it continues to run in the background. This is done to reduce the time it takes to start-up, and give you a better experience. But being in RAM they all consume battery. Either end them using your phones task manager or use some third-party application.
9. Use Black Background
If your phone has an AMOLED screen, then you must use some black image as a background. This will reduce the battery consumption for display manifolds. Also choose a dark theme if possible.
10.Setting Screen Timeout to the Least Value
Screen timeout is the duration after which your screen’s backlight goes off, when left untouched. Setting it to a lesser value will save battery of your Android phone.
11. Turn off Haptic Feedback
Haptic feedback is a phenomenon by which your phone gives a feedback in the form of vibration when you touch the screen. Though this is helpful while typing, but it consumes high resources. You should turn it off to save your phone’s battery.
12. Switch to Flight Mode
When in a flight, you should switch your mobile to flight mode. Since you have no network connectivity, your phone’s transmitter will keep trying to find a network. This will just drain battery and nothing else. So, switch to flight mode when on a plane. You can also turn it off if you don’t want to use it.
13. Activate The Power Saving Mode
You must activate power saving mode whenever you are not playing games or running some resource extensive app. The power saving mode by default limits the CPU usage, decreases the screen’s brightness, disables the data connection whenever the screen is off and turns off the haptic feedback. Precisely, this does most of the things you need to save battery of your Android phone.
14. Restrict Background Data
Many application like Gmail, Google Play Store and many others collect and send data to their servers in the background. This drains your battery at a very faster speed. To stop this you can restrict the data usage by enabling it from “Settings > Data Usage“, then click on options and select “Restrict background data“.

15. Don’t Install Resource Intensive Apps
There are many apps that use huge resources, you can figure them out by navigating to “Settings > Battery” on a samsung mobile. This will show you all the programs & Android services that are using up the battery. You can use this feature to monitor high battery drainer apps and then get rid of them.
16. Update Apps
App Developers are always working on their apps to make them better, faster, more interactive and make them use less resources. They always try to make them consume less battery power. So always keep your apps updated.

Now its time to poke your friends. Now you can automatically poke back your friends with this simple trick.Why do people Poke someone on Facebook? Is there a specific reason for poking someone? One of my blog reader asked me these questions and I did my research.The poking feature has no set meaning, it was made to be used in any way you like. Different people use it differently and this even differs from person to person. You can poke someone you have not talked with for sometime, just to show them that they are still not forgotten. You can poke your loved ones to tell them you miss them. And people do poke their friends just to disturb them. Some people even poke others to get their attention and to make them start a conversation. Different people interpret poking differently and react accordingly. So exercise caution. Share with your friends on facebook.
How To Auto Poke Your Facebook Friends
Getting many pokes can become irritating, and poking back all of them can worsen the situation furthermore. What if there was a way to auto poke people who poke you? Yes, you guessed it right, there is.Facebook Autopoke is a script that automatically pokes back anyone who pokes you, but they need to be listed at your home page. The script runs on all major browsers and is successfully tested on Chrome, Opera and Mozilla Firefox by the developer. You will need to have additional extension(s) to make it work though.
Installing Facebook Autopoke
You need different extensions to make it work on different browsers. See below for your browser.For Chrome
First install the Tampermonkey extension from Chrome Store and then install the Facebook Autopoke script from userscripts.org.For Firefox
First install the Greasemonkey extension and then install the Facebook Autopoke script.For Opera
For Opera, you need to have one extra extension. First install the Download Chrome Extension, then the Tampermonkey extension and then you can install the Facebook Autopoke scriptLINK: Facebook Autopoke


In terms of cost all the four services are giving free cloud storage service but being free they are limited in some or the other way. As a free storage, Dropbox provides 2 GB of free storage space and a daily bandwidth of 10 GB, Google Drive provides 5 GB of storage with unlimited bandwidth, SkyDrive provides 7 GB (Earlier it was 25 GB) with unlimited bandwidth as that in Google Drive. Box is a bit different and provides 5 GB’s of free storage but a monthly bandwidth of 10 GBs.
For premium users there are very different plans from all the four services :
Dropbox1Dropbox : With Dropbox you can have two types of accounts, one is the Pro account which is further of three types, 100 GB for $9.99, 200 GB for $19.99 and 500 GB for $49.99, the prices are for monthly billing. The other one is for teams, a team can have a minimum of 5 members and for 5 members you get 1000 GB’s of storage and costs you $795 a year. For every additional team member you get 200 GBs storage at a price of $125 a year.
Google Drive : It offers monthly plans which are priced at $2.49/month for 25 GB storage, $4.99 for 100 GB storage, $9.99 for 200 GB storage and so on up to 16 TBs which is priced at $799.99 a month.
Microsoft SkyDrive: In addition to the 7 GB free storage, you can buy more space at $10 for 20 GB , $25 for 50 GB and $50 for 100 GB. That means in total you will get 27 GBs, 57 GBs and 107 GBs with $10, $25 and $50 respectively.Box1Box : Box has come up with 3 types of premium storages, the Personal, Business and Enterprises. For personal storage it offers 25 GB storage at $10 and 50 GB storage at $20. For business storage you can have 3 to 500 users with online storage of 1000 GBs at $15 per user per month. For Enterprises the users can be unlimited with an unlimited storage but you need to get into talks with them for the pricing quotes.
In order to compare their performance and reliability we can upload the same file to all the above discussed services. According to Pingdom it was observed that all the four services gave almost similar results except from little dissimilarity. It was observed that the best performer was Box.com however Google Drive showed some minor outages but was somewhat close to a perfect result. If we talk about Microsoft SkyDrive and Dropbox, they experienced few outages, very high if we compare them to Box and Google Drive. When checked for a month Box.com showed no downtime, Google Drive was down for 1 minute and Dropbox and SkyDrive for 13 and 15 minutes .
These were just four of the best free online cloud storage services we used. There are many more services like these which you can try, it all depends upon what exactly are your demands. But if you are new to this and want to start off then you can surely go for anyone of these.
There are many people who are in love with Dropbox since it has proved to be a very useful tool which gives a very good performance level and reliability at all levels. Microsoft’s SkyDrive, Dropbox and Google Drive, all are focusing on storing your data right on the cloud, hence now you do not need a hard drive which are more prone of crashing and you might loss all your data. So with their storage tools you no more have to worry about internal storage space and backups.
P.S. All of them are great and are best at their service. But Box.com is good for the Enterprises. It already has 140,000 companies that share and access their content using Box. And for personal use we recommend Dropbox. It has larger bandwidth for file sharing and the storage can also be increased up to 18 GB (from 2 GB) by inviting your friends and uploading images from other devices to Dropbox.
LINKS: Dropbox, Googledrive, Sky Drive, Box.

Here is a detailed post to monitor your computer remotely, It works perfectly on every computer without any hassle. There are many apps that lets you access any other computer remotely, our favorite being Team Viewer. But if you don’t want to access the computer and want to spy on it instead, then you can do it very easily using the famous file sharing service, Drop box.
There can be many reasons to do this, some of them are listed below.You want to see what is being done on your office computer when you are away or at home.
You have small children at home and you want to make sure, they are not exposed to anything they are not supposed to see.
You may want to track the progress of any program or process running on your computer remotely.What Will We Do The concept is quite simple. We will install an application that can take screenshots using hot-keys and that can save screenshots to our synced Dropbox folder. Then we’ll automate this using another application that initiates the hot-keys after the set-interval.
Setting Up PC Monitoring Using Drop box
Make sure you have Drop box installed and it’s logged in with the account you want to sync your screenshots to.Install a screen capture utility that can capture the screen with hot-keys. You can use Dropbox Screen Grabber for this purpose. Just install the application and it will save all the screenshots to your Dropbox’s public folder. You can optionally change this folder to suit your needs. The program by default takes screenshots with the “Shift+F10″ key combination. You can customize this too.

Drop box Screen Grabber
Now we need a program that can initiate this key combination automatically after a set time interval. We will use AutoHotkey for this purpose.After installation, it will ask you for a file that it can use for the scripts. If you don’t have one, it will create it for you. Now in that file, paste the code given below.
Loop {The above script initiates the hotkey “Shift+F10″ after every 60 seconds. You can change it to any duration and also set the key combination if you have changed it in the program or you use some other program.
Send, {SHIFTDOWN}{F10}{SHIFTUP}
Sleep, 60000
}
That’s it. Now the Drop box Screen Grabber will take the screenshot after every one minute and will save it to your Drop box folder. The Drop box application will then upload it to Dropbox.com, which can then be accessed from any remote PC or mobile device.
Saturday 26 October 2013
I have uploaded a detailed video tutorial on hosting webpages on Google Drive. Watch the video tutorial for better understanding. You can use the same trick for hosting other files like .jpg, .js, .php etc.


In this blog post I will tell you how to host html files on Google drive. There are many reasons of hosting html file on Google drive. hosting html file on external websites having good bandwidth and download/upload speed increases the page loading speed. After hosting your files on Google drive, you will notice that You can use the same method o host html files and php files on Google drive.
Google drive gives you very huge storage space to store your files. You can store many files on your Google drive. For hosting a html file on google drive you need to have a good malware free html file to host and a google account. If you these things then follow these simple steps given below:
Recommended: How To Host Webpages On Google Drive
Google drive gives you very huge storage space to store your files. You can store many files on your Google drive. For hosting a html file on google drive you need to have a good malware free html file to host and a google account. If you these things then follow these simple steps given below:
Subscribe to:
Posts (Atom)
-
 This Blog Post will teach you how to add contact form to your blogger blog.Word about Google working on a official Contact Form gadget start...
 -
 Everyone Wants to make their blog stylish. Recently I developed a code to add new post and old post ribbon in blog posts. This ribbons will ...
 -
 Here is detailed article on adding a contact us widget to your blogger blog. With this simple widget your blog readers can can contact you. ...
 -
 Today we are going to share some tools that people use tool others, This time it is adsense fake image report generator tool. Next time when...
 -
 One of my personal favorites among the new features that Windows 7 came with was the introduction of some awesome and long awaited keyboard ...
 -
 Facebook is worlds popular social networking site.It is that success because most of them use Facebook for chatting with friends,sharing pic...
 -
 Windows Vista has a great new look, but after a while, the new look can get old. With the help of some cool tools and tricks, you can cust...
 -
 use this in emergency Try to open: Run -> cmb -> shutdown -a This prevent the shutdown. create a new shortcut.. then write; shutdown -...
 -
ASKEW googel trick is one of the most amazing google trick.When you search ASKEW in google search windows titlts. You must try this truicks....
-
For doing a barrel roll , you have to visit Google and then you must search "do a barrel roll", then the search will start to rota...

