The Blog Contains Information About Blogging. It has Blogger Widgets, templates and Much More About Blogging.

Monday 30 September 2013


The alternative boot screen that you just enabled in the preceding section is a great improvement compared to the boring moving progress bar that shows by default. However, this is still not good enough. With the help of a few cool tricks, you can create your own high-resolution, 24-bit boot screen without hacking any system files.
How is that possible? Thanks to the new language-independent operating system components in Windows Vista, some resources are stored in regional language files rather than the actual system components. This allows Microsoft to easily create a localized version of Windows Vista in any language by just creating new MUI (multilingual user interface) files that contain localized versions of bitmaps and text. Because MUI files are not digitally signed by Microsoft, you can make your own that has your own boot screen image in it, which allows you to customize the alternative boot screen to use any image you desire.
This new feature in Windows Vista provides a great
enhancement and alternative to the traditional method of hacking system files as you had to do in previous versions of Windows to do things such as changing the boot screen. In addition, there is a great tool developed by Dan Smith called the Vista Boot Logo Generator that will automatically compile the boot images you select into an MUI file. This makes the overall process simple compared to trying to change boot screens, as you did in the past.
To get started, you need two images, one 800 × 600 and one 1024 × 768 image, both saved as 24-bit bitmap images. When you have those images picked out, resized, and saved, you are ready to follow these steps:
  1. Visit http://www.computa.co.uk/staff/dan/?p=18 and download the latest copy of the Vista Boot Logo Generator and install it.
  2. Click the Start button, type vista boot logo, and press Enter.
  3. After the boot logo is downloaded, click the Browse for Images button in the 800 × 600 section and select your 800 × 600 24-bit bitmap image. Do the same for the 1024 × 768 section.
  4. After you have both images selected, click File and select Save Boot Screen file as to save your MUI file. Save it to your desktop.
  5. Next you need to replace the winload.exe.mui file located in c:\windows\system32\en-us with the file you just created. However, it is not as easy as a simple copy and paste because the Windows system files are protected. First, I recommend making a backup of the existing winload.exe.mui file so that you can copy it back if you have problems later. To get around the file protections, you need to take ownership of all the files in the en-us folder. Right-click the en-us folder and select Properties.
  6. Select the Security tab and then click the Advanced button at the bottom of the window.
  7. Select the Owner tab, and then click the Edit button.
  8. Select your account from the Account list and check Replace owner on subcontainers and objects. Click OK to apply your changes.
  9. Click OK to exit all the open Properties windows. You need to go back into the folder properties to change the file permissions. This time you will have more rights because you are now the folder owner. Right-click en-us and select Properties again.
  10. Click the Security tab, and this time click Edit.
  11. Click the Add button. Type in your username and click OK. Your account name should now appear on the Permissions list.
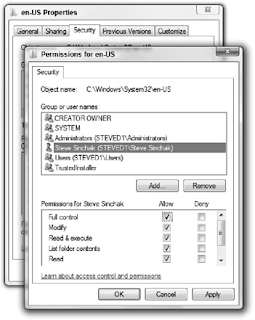
  12. Select your account, and then select the Allow column for Full control, as shown in Figure 1-3.

    Figure 1-3: Giving your account full control over the en-us MUI files to change the boot screen
  13. Click OK to save your changes and OK once more to close the Properties screen. You will now be able to copy the winload.exe.mui file you made and saved to your desktop to c:\windows\system32\en-us. After you copy the file and reboot, you should see your new boot screen.
If you do not see your new boot screen and instead see the progress bar, make sure that you turned on the alternative boot screen as shown in the previous section. If you have any problems with your new boot screen MUI file, you can always boot using your Windows Vista install CD into a command prompt and can copy back the old winload.exe.mui file.
Posted by John Peter on 08:46 | No comments
Windows Vista Hidden Bootscreen
Over the several years that Windows Vista was in the planning stages and in development, many promises were made about new features and enhancements. One of those promises had to do with high-resolution boot screens. This was going to be a great feature replacing the ancient 256-color boot screen that has been with Windows since Windows 95. Over time, as development of Vista was slipping behind schedule and developers were plagued with hardware compatibility problems with the high-resolution boot screen code, the feature was pulled from the final product.
Although this feature never made it into the released version of Windows Vista, there appears to be some parts of it left in the system. This section shows you a cool trick that will enable a hidden boot screen that looks like it was part of the high-resolution feature, as shown in Figure . It is nothing super fancy or elegant, but it sure is better than the boring boot screen that Vista shipped with, which looks like it is missing the Vista logo.
Before we proceed, note that some users have problems with using the hidden boot screen-possibly the reason why Microsoft hid it in the first place. If you are one of those users, simply boot into Safe mode and undo the steps for enabling the boot screen. Unfortunately, it is not currently known exactly what hardware has problems with the hidden boot screen. When you are ready, follow these steps to enable this boot screen on your PC:
  1. Click the Start button, type msconfig in the Search box, and then press Enter.
  2. When the System Configuration Utility loads, click the Boot tab.
  3. Locate the No GUI boot box and select it, as shown in Figure 1-2.
    Windows Vista Hidden Bootscreen
    Figure 1-2: Using the System Configuration utility to enable the hidden boot screen

  4. Click OK and reboot your computer.
You should see the hidden boot screen after you reboot your PC. As I mentioned earlier, if you have problems with the hidden boot screen, just boot into Safe mode (hold down F8 when you boot up) and remove the check from the No GUI Boot box.

Customizing the boot screen image

The alternative boot screen that you just enabled in the preceding section is a great improvement compared to the boring moving progress bar that shows by default. However, this is still not good enough. With the help of a few cool tricks, you can create your own high-resolution, 24-bit boot screen without hacking any system files.
How is that possible? Thanks to the new language-independent operating system components in Windows Vista, some resources are stored in regional language files rather than the actual system components. This allows Microsoft to easily create a localized version of Windows Vista in any language by just creating new MUI (multilingual user interface) files that contain localized versions of bitmaps and text. Because MUI files are not digitally signed by Microsoft, you can make your own that has your own boot screen image in it, which allows you to customize the alternative boot screen to use any image you desire.
This new feature in Windows Vista provides a great enhancement and alternative to the traditional method of hacking system files as you had to do in previous versions of Windows to do things such as changing the boot screen. In addition, there is a great tool developed by Dan Smith called the Vista Boot Logo Generator that will automatically compile the boot images you select into an MUI file. This makes the overall process simple compared to trying to change boot screens, as you did in the past.
To get started, you need two images, one 800 × 600 and one 1024 × 768 image, both saved as 24-bit bitmap images. When you have those images picked out, resized, and saved, you are ready to follow these steps:
  1. Visit http://www.computa.co.uk/staff/dan/?p=18 and download the latest copy of the Vista Boot Logo Generator and install it.
  2. Click the Start button, type vista boot logo, and press Enter.
  3. After the boot logo is downloaded, click the Browse for Images button in the 800 × 600 section and select your 800 × 600 24-bit bitmap image. Do the same for the 1024 × 768 section.
  4. After you have both images selected, click File and select Save Boot Screen file as to save your MUI file. Save it to your desktop.
  5. Next you need to replace the winload.exe.mui file located in c:\windows\system32\en-us with the file you just created. However, it is not as easy as a simple copy and paste because the Windows system files are protected. First, I recommend making a backup of the existing winload.exe.mui file so that you can copy it back if you have problems later. To get around the file protections, you need to take ownership of all the files in the en-us folder. Right-click the en-us folder and select Properties.
  6. Select the Security tab and then click the Advanced button at the bottom of the window.
  7. Select the Owner tab, and then click the Edit button.
  8. Select your account from the Account list and check Replace owner on subcontainers and objects. Click OK to apply your changes.
  9. Click OK to exit all the open Properties windows. You need to go back into the folder properties to change the file permissions. This time you will have more rights because you are now the folder owner. Right-click en-us and select Properties again.
  10. Click the Security tab, and this time click Edit.
  11. Click the Add button. Type in your username and click OK. Your account name should now appear on the Permissions list.
  12. Select your account, and then select the Allow column for Full control, as shown in Figure 1-3.
    Windows Vista Hidden Bootscreen

    Figure 1-3: Giving your account full control over the en-us MUI files to change the boot screen
  13. Click OK to save your changes and OK once more to close the Properties screen. You will now be able to copy the winload.exe.mui file you made and saved to your desktop to c:\windows\system32\en-us. After you copy the file and reboot, you should see your new boot screen.
If you do not see your new boot screen and instead see the progress bar, make sure that you turned on the alternative boot screen as shown in the previous section. If you have any problems with your new boot screen MUI file, you can always boot using your Windows Vista install CD into a command prompt and can copy back the old winload.exe.mui file.
Posted by John Peter on 08:43 | No comments | Categories:
Windows Vista has a great new look, but after a while, the new look can get old. With the help of some cool tools and tricks, you can customize many components of Windows Vista.
This chapter guides you through customizing two parts of your computer: the boot screen and the Welcome/Logon screen. I show you how to replace the boring boot screen and even how to activate a hidden boot screen.
Then this chapter moves on to a discussion of customizing the second part of your computer startup, the Welcome/Logon screen. This screen can be customized in several ways, such as customizing the user pictures and various settings that will allow you to increase your privacy and change the way the Logon screen behaves. I even show you how to change your Logon screen background.

Customizing the Boot Screen

Every time I turn on my computer, I am forced to stare at the boring Windows boot screen. I must admit that I found the moving bars amusing at first, but after a few months I became bored and wanted something different. Changing the boot screen is not something that Microsoft made easy; however, it is still possible with a few cool hacks.

Activating the hidden boot screen

Over the several years that Windows Vista was in the planning stages and in development, many promises were made about new features and enhancements. One of those promises had to do with high-resolution boot screens. This was going to be a great feature replacing the ancient 256-color boot screen that has been with Windows since Windows 95. Over time, as development of Vista was slipping behind schedule and developers were plagued with hardware compatibility problems with the high-resolution boot screen code, the feature was pulled from the final product.
Although this feature never made it into the released version of Windows Vista, there appears to be some parts of it left in the system. This section shows you a cool trick that will enable a hidden boot screen that looks like it was part of the high-resolution feature, as shown in Figure 1-1. It is nothing super fancy or elegant, but it sure is better than the boring boot screen that Vista shipped with, which looks like it is missing the Vista logo.
Figure 1-1: Hidden boot screen in Windows Vista
Before we proceed, note that some users have problems with using the hidden boot screen-possibly the reason why Microsoft hid it in the first place. If you are one of those users, simply boot into Safe mode and undo the steps for enabling the boot screen. Unfortunately, it is not currently known exactly what hardware has problems with the hidden boot screen. When you are ready, follow these steps to enable this boot screen on your PC:
  1. Click the Start button, type msconfig in the Search box, and then press Enter.
  2. When the System Configuration Utility loads, click the Boot tab.
  3. Locate the No GUI boot box and select it, as shown in Figure 1-2.
    Figure 1-2: Using the System Configuration utility to enable the hidden boot screen

  4. Click OK and reboot your computer.
You should see the hidden boot screen after you reboot your PC. As I mentioned earlier, if you have problems with the hidden boot screen, just boot into Safe mode (hold down F8 when you boot up) and remove the check from the No GUI Boot box.

Customizing the boot screen image

The alternative boot screen that you just enabled in the preceding section is a great improvement compared to the boring moving progress bar that shows by default. However, this is still not good enough. With the help of a few cool tricks, you can create your own high-resolution, 24-bit boot screen without hacking any system files.
How is that possible? Thanks to the new language-independent operating system components in Windows Vista, some resources are stored in regional language files rather than the actual system components. This allows Microsoft to easily create a localized version of Windows Vista in any language by just creating new MUI (multilingual user interface) files that contain localized versions of bitmaps and text. Because MUI files are not digitally signed by Microsoft, you can make your own that has your own boot screen image in it, which allows you to customize the alternative boot screen to use any image you desire.
This new feature in Windows Vista provides a great enhancement and alternative to the traditional method of hacking system files as you had to do in previous versions of Windows to do things such as changing the boot screen. In addition, there is a great tool developed by Dan Smith called the Vista Boot Logo Generator that will automatically compile the boot images you select into an MUI file. This makes the overall process simple compared to trying to change boot screens, as you did in the past.
To get started, you need two images, one 800 × 600 and one 1024 × 768 image, both saved as 24-bit bitmap images. When you have those images picked out, resized, and saved, you are ready to follow these steps:
  1. Visit http://www.computa.co.uk/staff/dan/?p=18 and download the latest copy of the Vista Boot Logo Generator and install it.
  2. Click the Start button, type vista boot logo, and press Enter.
  3. After the boot logo is downloaded, click the Browse for Images button in the 800 × 600 section and select your 800 × 600 24-bit bitmap image. Do the same for the 1024 × 768 section.
  4. After you have both images selected, click File and select Save Boot Screen file as to save your MUI file. Save it to your desktop.
  5. Next you need to replace the winload.exe.mui file located in c:\windows\system32\en-us with the file you just created. However, it is not as easy as a simple copy and paste because the Windows system files are protected. First, I recommend making a backup of the existing winload.exe.mui file so that you can copy it back if you have problems later. To get around the file protections, you need to take ownership of all the files in the en-us folder. Right-click the en-us folder and select Properties.
  6. Select the Security tab and then click the Advanced button at the bottom of the window.
  7. Select the Owner tab, and then click the Edit button.
  8. Select your account from the Account list and check Replace owner on subcontainers and objects. Click OK to apply your changes.
  9. Click OK to exit all the open Properties windows. You need to go back into the folder properties to change the file permissions. This time you will have more rights because you are now the folder owner. Right-click en-us and select Properties again.
  10. Click the Security tab, and this time click Edit.
  11. Click the Add button. Type in your username and click OK. Your account name should now appear on the Permissions list.
  12. Select your account, and then select the Allow column for Full control, as shown in Figure 1-3.

    Figure 1-3: Giving your account full control over the en-us MUI files to change the boot screen
  13. Click OK to save your changes and OK once more to close the Properties screen. You will now be able to copy the winload.exe.mui file you made and saved to your desktop to c:\windows\system32\en-us. After you copy the file and reboot, you should see your new boot screen.
If you do not see your new boot screen and instead see the progress bar, make sure that you turned on the alternative boot screen as shown in the previous section. If you have any problems with your new boot screen MUI file, you can always boot using your Windows Vista install CD into a command prompt and can copy back the old winload.exe.mui file.
Posted by John Peter on 08:37 | No comments | Categories:
missing required field updated error
Its time to fix some common errors in you blog. In this blog post we are going to discus common structured data errors. You can use Google webmaster tools to detect them.Google already added Structured Data in blogger templates but there's a common error in Structured Data markup like Missing Required field, not part of schema, etc.
This common error affect your search appearance and affect your site crawling.
This microformat has a common problem such as missing required field updated. This affect search appearance. To correct this use the guide below:

Missing Required Field Updated

This means that Search engine can't find date it was published or last updated.
To fix it use the guide below:
Find this code:
<data:post.timestamp/>
Replace it with this code:

<span class='updated'><data:post.timestamp/></span>
Posted by John Peter on 02:48 | No comments | Categories: ,
image
Social sharing widgets play a vital role in blogosphere and has become one of the tremendous factor for each blog and websites. You might have seen allot of blogs and websites holdings different styles of social sharing widgets. Likely If you take a tour of my Blog then you will find different types of social sharing gadget on different locations. Each social sharing gadget has its own task to publish posts on different social media websites. You can put your gadgets according to your blog designing and layouts. So if you are a regular BrainOFComputer reader then you might be aware that in early days we have published so many Blogger Widgets and Plugins they were well appreciated and liked by Newbies.

So since from the couple of days we have received so many request from our loyal readers, Asking for social sharing widgets. 

All in One Social Sharing widget Below Every Posts For Blogger

You can easily grab all these social sharing websites buttons together at one place. This all in one social sharing plugins, will add to blogger below every posts which will help in sharing your article within a seconds.This widget is fully customized for blogger blogs which holds all popular social sharing websites plugins. We have included Facebook, Twitter, Google plus, StumbleUpon, Digg,Delicious and Technorati widget.

Why We have Removed Pinterest Buttons

You might be thinking why pinterest buttons is silent in the gadget. before thinking too much let me tell you are you interested to increase your page loading time. Do you want to compel your blog on loading time by your own hands. The Answers is absolutely No.No body will give up this habit. Every blogger and webmaster always try to decrease blog loading time and always try to make page loading time faster and faster. So if you have added pinterest button in your posts then your blog page loading time must be increased several times. Pinterest Button work with JavaScript. If someone wish to add pinterest button into blog then he must be added this button with JavaScript coding otherwise the pinterest button will not work correctly and will be no in use to publish your post on pinterest. So that's why we have eliminated this button from the gadget.

Add All in One Social Sharing Buttons widget below Every post in Blogger.


There is nothing to worry follow the below straight forwards steps to add this gadget into your blog. Before going to add this gadget lets find out its demo how it look liked.
Sharing Widget
Attention: If any one want to share this widget on his/her blog then do not forget to give credit links back  to Tricks Tower. Also  Don't change the credit names .  Anyone who does not link back then it could be destroyed his Blog post maliciously. If you do so the legal action will be taken against him.
Step 1:
  • Go To Blogger Dashboard:
  • Go to >> Template >> Edit/Html:
  • Now find for <data:post.body/> or <p><data:post.body/></p> and past the below given code:
  • If you could not find the above tags then look at the below illustrative screenshot.
    blogger template editor

After clicking on the var'post' scroll down slowly you will find one of these codes<data:post.body/> or

<data:post.body/> and past the below given code.
<!--new social sharing code by tricks tower and brain-of-computer start-->
<!--style sheet start-->
<style>
/*------Tricks Tower Social Sharing Widget For Blogger -Start----*/
ul.social_BrainOFComputer {
list-style: none !important;
display: inline-block;
margin: 15px 0 0 0px;
}
ul.social_BrainOFComputer li {
display:inline;
float:left;
background-repeat:no-repeat;
}
ul.social_BrainOFComputer li a {
display:block;
width:35px;
height:50px;
padding-right:10px;
position:relative;
text-decoration:none;
}
ul.social_BrainOFComputer li a strong {
font-weight:400;
position:absolute;
left:20px;
top:-1px;
color:#fff;
z-index:9999;
text-shadow:1px 1px 0 rgba(0,0,0,0.75);
background-color:rgba(0,0,0,0.7);
-moz-border-radius:3px;
-moz-box-shadow:0 0 5px rgba(0,0,0,0.5);
-webkit-border-radius:3px;
-webkit-box-shadow:0 0 5px rgba(0,0,0,0.5);
border-radius:3px;
box-shadow:0 0 5px rgba(0,0,0,0.5);
padding:3px;
}
ul.social_BrainOFComputer li.abfacebook {
background-image:url(https://blogger.googleusercontent.com/img/b/R29vZ2xl/AVvXsEhLFzN0OCpap4zFBL30rwuvGkUkABDTsJtKIQhyphenhypheny0jFZthY9YgJ3H6iN9kVECPKdGilET6NX1cPjAsNc1Ypt-mA6ixBlG56GLqf5HKla86A459GGLDOO3Xn0ecf4AQLwJePlqq6qnJkhOcT/s1600/btrix-facebook-icon.png) !important;
}
ul.social_BrainOFComputer li.abtwitter {
background-image:url(https://blogger.googleusercontent.com/img/b/R29vZ2xl/AVvXsEh5Og83ZDSqgQ8fxby5pJNZPEOGWYD5UMbtVff8pBpoUHD9Rj8OEZ49VQB9p1Ka9Q3hAY5OI9UlzGeLVp0AeNoVS0UyTdLShruNiMuLDowuxyN1ooiI31uhWnPtIl1Onv4WCeet9MpHeuXG/s1600/btrix-twitter-icon.png)!important;
}
ul.social_BrainOFComputer li.abgoogleplus {
background-image:url(https://blogger.googleusercontent.com/img/b/R29vZ2xl/AVvXsEiDWAw0Wyaw8k8WHiBYdeYSc1TrbRufTdStHxAygz6BgIB4zhw75XS-X8fInAJMSfbpyimUp9RFq5UKBPn3Y8FXJw-jqbTL2tUFc-1Fj_-nADelvGK5A0nqisHnxaSC_se190WPWalTihyphenhyphenX/s1600/btrix-google-icon.png)!important;
}
ul li.abpinterest {
background-image: url(https://blogger.googleusercontent.com/img/b/R29vZ2xl/AVvXsEh8L95vuVSVt4l9zg8ptdmjIRUvjrFfoBRXBn5iirIv21dDe1mi-GZ8CVX8HB9XPER4NY_wdubkS5NmXN2irPZS3z449EVBqTS9_GsFK03o5VphTa_Je9Qu1DWBa2Q5fy_soT_H8mGnRvRM/s1600/btrix-Pinterest-icon.png)!important;
}
ul.social_BrainOFComputer li.abstumbleupon {
background-image:url(https://blogger.googleusercontent.com/img/b/R29vZ2xl/AVvXsEjJFMbQk4kXzppO7CgiuP9BJRtmxGOUDR-Gi8KhaEG8cfPWxSY5o305wC1y5TI58M1SgenSluBE4e1b7iKBM2Vwos5LqUEdIrDZLSXrWM9DK9aFlAQMSXQ_Mq-UvqmM_-EQCkLOEDAG-NQr/s1600/btrix-StumbleUpon-icon.png)!important;
}
ul.social_BrainOFComputer li.abdig {background-image:url(https://blogger.googleusercontent.com/img/b/R29vZ2xl/AVvXsEgLmEC_k5e0ulJ59KkEGuf5uDHGs5zXDro6tbRHti9rNXoKxOw-hnfvOtS1ECnqlw6UqnCDLJjEqxSHM7Sg6ZmAqxSnptwKE6gTgMwMwHj60JEh2YHAM33YnF_EoYbJ6fYNgfvXquQRWegV/s1600/btrix-Digg-icon.png)!important;
}
ul.social_BrainOFComputer li.ablinkedin {
background-image:url(https://blogger.googleusercontent.com/img/b/R29vZ2xl/AVvXsEhoOTDQV8_CM0yFUXQdcL3juzVGgDVXTfM_LSR2PQvFDM-6n5Fn_p-Z1aFBA39dZfHGMIoM6kQ1j8U7gIR_bObfK4uBMidPzPifa2LFajTm4kXDL45hN59sGcLcbHjBHAUP0Ebm68ed4M8q/s1600/btrix-Linkedin-icon.png)!important;
}
ul.social_BrainOFComputer li.abrdit { background-image:url("https://blogger.googleusercontent.com/img/b/R29vZ2xl/AVvXsEg6nIIzMlswEcO6m3gl7b50OCCC6rBDUOMMuOXpF5ki3gLb0Ubzax-qHd9jveQneGXYvmiPEzbkDp12NzmGiH0WHxz2fEHvl5DleP5oteZp9yVejkpqcig0__rSBAyEX2IKGQU7wUgqfcU/s1600/redit.png")!important; }
ul.social_BrainOFComputer li.abdelis { background-image:url("https://blogger.googleusercontent.com/img/b/R29vZ2xl/AVvXsEi7FZdbLfqGoUsMs6xX3ZFMNmwPrLo9e0_-kQa_Soc5-T7bLfvY9Y0Px3uDa3gZQhnnNef4jhsdf0hQwl_7AHkJJV3c85kxkXATWKAHnSTrzF0x3JMPzeJy4WRN8UF01SeKo9axqW9F5-I/s1600/delecious.png")!important; }
ul.social_BrainOFComputer li.abtechno { background-image:url("https://blogger.googleusercontent.com/img/b/R29vZ2xl/AVvXsEiZq-lyaxLBjdq80g-MxdLB-5fTVBK_IxpKyykbhQajUCPn4iUcs1s1PoAvt_dPKNHq1tZ0QlVpFAwD6-Y0IomvM6Bo2S4pHKz_6y_VK_rzp7BtoCOcdGU1-EbRCPeKhV9abBQA6Op_vVA/s1600/technorathi.png")!important; }
#animation_BrainOFComputer:hover li {
opacity:0.2;
}
#animation_BrainOFComputer li {
-webkit-transition-property:opacity;
-webkit-transition-duration:500ms;
-moz-transition-property:opacity;
-moz-transition-duration:500ms;
}
#animation_BrainOFComputer li a strong {
opacity:0;
-webkit-transition-property:opacity, top;
-webkit-transition-duration:300ms;
-moz-transition-property:opacity, top;
-moz-transition-duration:300ms;
}
#animation_BrainOFComputer li:hover {
opacity:1;
}
#animation_BrainOFComputer li:hover a strong {
opacity:1;
top:-10px;
}

#subbutton {
    background: none repeat scroll 0 0 #0089E0;
    border: 1px solid #292929;
    border-radius: 5px 15px 5px 15px;
    color: #FFFFFF;
    font-weight: bold;
    height: 40px;
    margin-top: 15px;
    text-transform: uppercase;
    transition: border-radius 0.5s ease 0s;
}
#subbutton:hover {
    border-radius: 15px 5px 15px 5px;
}
/*------Tricks Tower Social Sharing Widget For Blogger -End----*/
</style>
<!--style sheet end-->
<b:if cond='data:blog.pageType == &quot;item&quot;'>
<div style='border-bottom: 1px solid #ddd;  border-top: 1px dotted #ddd;  color: #000000;  font-size: 24px; margin: 45px 0px 10px;  padding: 15px 30px'><b>Share This Article with your Friends</b></div>
    <ul class='social_BrainOFComputer' id='animation_BrainOFComputer'>
    <li class='abfacebook'>
    <a expr:href='&quot;http://www.facebook.com/share.php?v=4&amp;src=bm&amp;u=&quot; + data:post.url + &quot;&amp;t=&quot; + data:post.title ' onclick='window.open(this.href,&apos;sharer&apos;,&apos;toolbar=0,status=0,width=626,height=436&apos;); return false;' rel='nofollow'><strong>Facebook</strong></a>
    </li>
    <li class='abtwitter'>
    <a expr:href='&quot;http://twitter.com/home?status=&quot; + data:post.title + &quot; -- &quot; + data:post.url ' rel='nofollow' target='_blank'><strong>Twitter</strong></a>
    </li>
    <li class='abgoogleplus'>
<a expr:href='&quot;https://plusone.google.com/_/+1/confirm?hl=en&amp;url=&quot; + data:post.url' onclick='window.open(this.href,&apos;sharer&apos;,&apos;toolbar=0,status=0,width=626,height=436&apos;); return false;' rel='nofollow' target='_blank'><strong>Google+</strong></a>
    </li>
    <li class='abstumbleupon'>
    <a expr:href='&quot;http://www.stumbleupon.com/submit?url=&quot; + data:post.url + &quot;&amp;title=&quot; + data:post.title ' rel='nofollow' target='_blank'><strong>StumbleUpon</strong></a>
    </li>
    <li class='abdig'>
      <a expr:href='&quot;http://digg.com/submit?url=&quot; + data:post.url + &quot;&amp;title=&quot; + data:post.title' rel='nofollow' target='_blank'><strong>Dig</strong></a>
    </li>
    <li class='ablinkedin'>
    <a expr:href='&quot;http://www.linkedin.com/shareArticle?mini=true&amp;url=&quot; + data:post.url + &quot;&amp;title=&quot; + data:post.title + &quot;&amp;summary=&amp;source=&quot;' rel='nofollow' target='_blank'><strong>LinkedIn</strong></a>
    </li>
<li class='abrdit'>
<a expr:href='&quot;http://reddit.com/submit?url=&quot; + data:post.url + &quot;&amp;title=&quot; + data:post.title ' rel='nofollow' target='_blank' title='Share this on Reddit'><strong>Reddit</strong></a>
</li>
<li class='abdelis'>
<a expr:href='&quot;http://delicious.com/post?url=&quot; + data:post.url + &quot;&amp;title=&quot; + data:post.title ' rel='nofollow' target='_blank' title='Share this on del.icio.us'><strong>Delicious</strong></a>
</li>
<li class='abtechno'>
<a expr:href='&quot;http://technorati.com/faves?add=&quot; + data:post.url ' rel='nofollow' target='_blank' title='Share this on Technorati'><strong>Technorati</strong></a>
</li>
    </ul>
    </b:if>
<!--new social sharing code by brain-of-computer end-->
Note: this code appears only on your post pages.
Posted by John Peter on 02:47 | No comments | Categories: ,
imageIn the past tutorial, I've shared a simple Recent Comments widget, now you have the option to add a stylish Recent comments widget with round avatars, which comes along with comment excerpts. You also have the option to change default Anonymous Avatar Image.
Step 1. Go to Blogger Dashboard, then go to Layout and click on Add a Gadget link.
Step 2. In the popup window scroll down + choose HTML/Javascript


image
Step 3. Paste in the following code in the empty box:


<!—tricks tower_recent comments code start—>
<style type="text/css">
ul.w2b_recent_comments {
    list-style: none;
    margin: 0;
    padding: 0;
}
.w2b_recent_comments li {
    background: none !important;
    margin: 0 0 6px !important;
    padding: 0 0 6px 0 !important;
    display: block;
    clear: both;
    overflow: hidden;
    list-style: none;
}
.w2b_recent_comments li .avatarImage {
    padding: 3px;
    background: #fefefe;
    -webkit-box-shadow: 0 1px 1px #ccc;
    -moz-box-shadow: 0 1px 1px #ccc;
    box-shadow: 0 1px 1px #ccc;
    float: left;
    margin: 0 6px 0 0;
    position: relative;
    overflow: hidden;
}
.avatarRound {
    -webkit-border-radius: 100px;
    -moz-border-radius: 100px;
    border-radius: 100px;
}
.w2b_recent_comments li img {
    padding: 0px;
    position: relative;
    overflow: hidden;
    display: block;
}
.w2b_recent_comments li span {
    margin-top: 4px;
    color: #666;
    display: block;
    font-size: 12px;
    font-style: italic;
    line-height: 1.4;
}
</style>
<script type="text/javascript">
//<![CDATA[
    // Recent Comments Settings
    var
numComments  = 5,
showAvatar  = true,
avatarSize  = 60,
roundAvatar = true,
characters  = 40,
showMorelink = false,
moreLinktext = "More »",
defaultAvatar  = "http://img1.blogblog.com/img/anon36.png",
hideCredits = true;
//]]>
</script>
<script type="text/javascript" > //<![CDATA[
/**
 * Recent Comments Widget with Avatar for Blogger
 * Version : 1.3
 * Author  : Dinesh Rajkumar Bhosale
 * Author Url  : http://www.trickstower.blogspot.com/
 * (c) 2012 allrightsreserved.
 *
 * --==Options==--
 *  var  numComments  = 5,
 *  showAvatar  = true,
 *  avatarSize  = 60,
 *  roundAvatar = true,
 *  showMorelink = false,
 *  moreLinktext = "More &raquo;"
 *  characters  = 40,
 *  defaultAvatar  = "http://www.gravatar.com/avatar/?d=mm",
 *  hideCredits = false;
 *
 */

eval(function(p,a,c,k,e,d){e=function(c){return(c<a?'':e(parseInt(c/a)))+((c=c%a)>35?String.fromCharCode(c+29):c.toString(36))};if(!''.replace(/^/,String)){while(c--){d[e(c)]=k[c]||e(c)}k=[function(e){return d[e]}];e=function(){return'\\w+'};c=1};while(c--){if(k[c]){p=p.replace(new RegExp('\\b'+e(c)+'\\b','g'),k[c])}}return p}('7 D=D||5,9=9||19,A=A||1a,m=m||"h://W.S.g/16/?d=18",E=E||" 1p &1f;",v=(p v===\'o\')?j:v,z=(p z===\'o\')?Z:z,n=(p n===\'o\')?j:n,M=(p M===\'o\')?Z:n;1l 12(L){7 b;b=\'<Y C="12">\';H(7 i=0;i<D;i++){7 x,y,2,k;4(i==L.14.8.q)1g;b+="<X>";7 8=L.14.8[i];H(7 l=0;l<8.I.q;l++){4(8.I[l].1j==\'1o\'){x=8.I[l].w}}H(7 a=0;a<8.K.q;a++){y=8.K[a].1i.$t;2=8.K[a].1h$1k.N}4(2.f("/O/")!=-1){2=2.u("/O/","/s"+9+"-c/")}e 4(2.f("/T/")!=-1){2=2.u("/T/","/s"+9+"-c/")}e 4(2.f("/U-c/")!=-1&&2.f("h:")!=0){2="h:"+2.u("/U-c/","/s"+9+"-c/")}e 4(2.f("G.g/B/1n-P.J")!=-1){2="h://3.13.Q.g/-1m-1e/17/1c/1b/s"+9+"/15.R"}e 4(2.f("G.g/B/1d-P.J")!=-1){2="h://3.13.Q.g/-1R/1U/1P/1K/s"+9+"/1J.R"}e 4(2.f("G.g/B/1M.J")!=-1){4(m.f("S.g")!=-1){2=m+"&s="+9}e{2=m}}e{2=2}4(v==j){4(n==j){k="1O"}e{k=""}b+="<V C=\\"1T "+k+"\\"><B C=\\""+k+"\\" N=\\""+2+"\\" 1H=\\""+y+"\\" 1w=\\""+9+"\\" 1I=\\""+9+"\\"/></V>"}b+="<a w=\\""+x+"\\">"+y+"</a>";7 11=8.1v.$t;7 6=11.u(/(<([^>]+)>)/1u,"");4(6!=""&&6.q>A){6=6.1r(0,A);6+="&1s;";4(z==j){6+="<a w=\\""+x+"\\">"+E+"</a>"}}e{6=6}b+="<r>"+6+"</r>";b+="</X>"}b+=\'</Y>\';7 F="";4(M==j){F="10:1F;"}b+="<r 1G=\\"1E-1D:1A;10:1B;1C-1S:1z;"+F+"\\">1y 1t<a w=\\"h://W.1x.1L/\\">1Q</a></r>";1N.1q(b)}',62,119,'||authorAvatar||if||commBody|var|entry|avatarSize||commentsHtml|||else|indexOf|com|http||true|avatarClass||defaultAvatar|roundAvatar|undefined|typeof|length|span|||replace|showAvatar|href|commentlink|authorName|showMorelink|characters|img|class|numComments|moreLinktext|hideCSS|blogblog|for|link|gif|author|w2b|hideCredits|src|s1600|rounded|blogspot|png|gravatar|s220|s512|div|www|li|ul|false|display|commHTML|w2b_recent_comments|bp|feed|w2b_blogger_logo|avatar|TxMKLVzQ5BI|mm|60|40|QYau8ov2blE|AAAAAAAABYY|openid16|1X32ZM|raquo|break|gd|name|rel|image|function|AaI8|b16|alternate|More|write|substring|hellip|by|ig|content|width|way2blogging|Widget|right|10px|block|text|size|font|none|style|alt|height|w2b_openid_logo|8iasY0xpLzc|org|blank|document|avatarRound|AAAAAAAABYc|Way2Blogging|9lSeVyNRKx0|align|avatarImage|TxMKMIqMNuI'.split('|'),0,{}))

//]]> </script>
<script type="text/javascript" src="http://brain-of-computer.blogspot.com/feeds/comments/default?alt=json&callback=w2b_recent_comments&max-results=5"></script>
<!—tricks tower recent comments code end—>


Note:
Replace brain-of-computer with the name of your blog.
Replace the "5" values in red, with the number of comments you want to appear... from:
  • numComments  = 5 

and
  • max-results=5
  • Reduce or increse the avatarsize: 60; to reduce or increase the avatar image size.
  • If you want To change the anonymous avatar, replace the following address with your own:
http://img1.blogblog.com/img/anon36.png
Step 4. After you've made the changes, click Save... and you're done!
Attention:
If you remove the credits from the code then entire code will crash and it will cause malicious damage to your blog . So, please do not remove credits from the code.

Posted by John Peter on 02:42 | No comments | Categories: ,

Sunday 29 September 2013

Blogid Postid structured data errors In the rich snippest tool of google webmaster tools many users get an error related to blogid and post id. Given below are some examples:
  • Error: Page contains property "blogid" which is not part of the schema.
  • Error: Page contains property "postid" which is not part of the schema.
For fixing this errors you can delete these codes from your blog template.

For deleting this codes follow the above steps:
  1. Make backup of your template.
  2. Go into your template code.
  3. search for below codes and delete them from the entire template and save the template..
<meta expr:content='data:blog.blogId' itemprop='blogId'/>
<meta expr:content='data:post.id' itemprop='postId'/>

After deleting these codes from your blog template you can check your structured data in rich snippets tool. If you still get the same error then try deleting all the codes given above from your blogger template.
Posted by John Peter on 01:10 | No comments | Categories: ,
structured data errors
It’s time to fix some common errors in you blog. In this blog post we are going to discus common structured data errors. You can use Google webmaster tools to detect them. Google already added Structured Data in blogger templates but there's a common error in Structured Data markup like missing required field, not part of schema, etc... This common error affects your search appearance and affects your site crawling. This micro format has a common problem such as missing required field updated. This affects search appearance. To correct this use the guide below:  Many people’s use Google webmaster structured data testing tool for determining the structure of the web page. While using this tool many people’s get an error regarding to their structure page Contains Property "image_url" Which Is Not Part of The Schema Error can be easily fixed by deleting

<meta expr:content='data:post.firstImageUrl' itemprop='image_url'/>
from the entire template. But, wait that’s not the correct solution. because after deleting “<meta expr:content='data:post.firstImageUrl' itemprop='image_url'/>" code from your entire template you loose an important ability of your template or webpage to give information about the thumbnails and images used in the blog post or webpage to search engines. Also when you share your posts on social networking sites like Google plus and Facebook, the thumbnail used for the post doesn't appears.I recommend you to add Facebook open graph meta description tags in your blogger template or website so the images used in the webpage can appear correctly while sharing it on Facebook. And don't forget about twitter, and remember to add twitter cards meta data.

HERE IS THE REAL SOLUTION: Fix Page Contains Property "image_url" Which Is Not Part of The Schema Error

Go into your blog template or html code of you web page.
search for:
<meta expr:content='data:post.firstImageUrl' itemprop='image_url'/>
now replace this code with the code given below:
<meta expr:content='data:post.firstImageUrl' itemprop='image'/>
We have replaced the ‘image_url’ with ‘image’ to fix the error.

Fix Missing Required Field Updated Error

This means that Search engine can't find date it was published or last updated.
To fix it use the guide below:
Find this code:
<data:post.timestamp/>
 Replace it with this code:

<span class='updated'><data:post.timestamp/></span>
 Bingo! now you have fixed missing required field updated error!

Page Contains Property blogid, postid Which Is Not Part of The Schema Error

structured data errors

In the rich snippets tool of Google webmaster tools many users get an error related to blogid and post id. Given below are some examples:

  • Error: Page contains property "blogid" which is not part of the schema.
  • Error: Page contains property "postid" which is not part of the schema.

For fixing these errors you can follow the steps given below.

  1. Make backup of your template.
  2. Go into your template code.
  3. search for below codes and delete them from the entire template and save the template..
<meta expr:content='data:blog.blogId' itemprop='blogId'/>
<meta expr:content='data:post.id' itemprop='postId'/>

This error is not so harmful, you can leave it as it is. After deleting these codes from your blog template you can check your structured data in rich snippets tool. If you are still getting the same error then try deleting all the codes given above from your blogger template. 

How To Fix Missing Required Field hCard"author"

Recently our fellow blog reader asked us how to fix missing required field hCard"author" error. missing required field hCard"author" error means search engines are unable to find the name or Google plus profile URL of the person that has written the blog post. This error can be easily fixed by adding a simple code in your blogger template. Add the code given below where you want your author profile to appear. In the screenshot given below you can see where my author profile appears in my blog pots. Remember that you need to add this code inside your post body. Add this code right after "<data:post.body/>" tag.

Fix Missing Required Field hCard"authot"
You don't need to make changes in this code. Just add this code in your blogger template and it will automatically find the name and Google plus URL of the person that has published the post. Also when someone mouse over your author profile, it automatically opens up a small Google plus profile box.


<!-- hCard"author" error fixer by brian-of-computer.blogspot.com -->
<span class='post-author vcard'>
<b:if cond='data:top.showAuthor'>
<b:if cond='data:post.authorProfileUrl'>
<span class='fn' itemprop='author' itemscope='itemscope' itemtype='http://schema.org/Person'>
<meta expr:content='data:post.authorProfileUrl' itemprop='url'/>
<a expr:href='data:post.authorProfileUrl' rel='author' title='author profile'>
<span itemprop='name'><data:post.author/></span>
</a>
</span>
<b:else/>
<span class='fn' itemprop='author' itemscope='itemscope' itemtype='http://schema.org/Person'>
<span itemprop='name'><data:post.author/></span>
</span>
</b:if>
</b:if>
</span>
<div class='author-profile' itemprop='author' itemscope='itemscope' itemtype='http://schema.org/Person'>
<b:if cond='data:post.authorPhoto.url'>
<img expr:src='data:post.authorPhoto.url' itemprop='image' width='50px'/>
</b:if>
<div>
<a class='g-profile' expr:href='data:post.authorProfileUrl' itemprop='url' rel='author' title='author profile'>
<span itemprop='name'><data:post.author/></span>
</a>
</div>
<span itemprop='description'><data:post.authorAboutMe/></span>
</div>

After adding this simple piece of code you will see that hCard"author" error is fixed. This code also contains rel='author' tag so it will help you to verify authorship markup. In one word I can say that this code is all in one code to tell the search engines that you are the real author of your blog post.

Visit this link to see whether all the errors are fixed or not: link to structured data testing tool.When all the errors will get fixed, please check that while sharing a post the thumbnail of the post is appearing correctly or not. And one thing that forgot to tell that even default blogger templates contains structured data errors so don't worry too much about structured data errors and they are very easy to fix. I hope this article will help you to kick out all the structured data errors in your blogger template. Peace and blessings!
Posted by John Peter on 01:06 | 3 comments | Categories: ,
image
Related posts widget is very important for a blog, because it increases the number of page views and also help the visitor to view other posts related to blog. Now here is wonderful trick to display links to related posts beneath each posts. At their blogs today there are many types of related post widget, and related items thumbnail images using HTML, Java script, etc. .. Here I will show a method that is easy to show install.It related post widget will look like a picture above.

Steps to add related post widget are given below.
STEP1:→ At your blogger dashboard click on template then click on edit html.
STEP2:→ In your template html code search for "  <div class='post-footer'>   “.
STEP2:→ Then add the code given below right after <div class='post-footer'> code.
<!--related posts by tricks tower start-->
<b:if cond='data:blog.pageType == &quot;item&quot;'>
<style type='text/css'>
#related-posts {
float:center;
text-transform:none;
height:100%;
min-height:100%;
padding-top:5px;
padding-left:5px;
margin-top: 20px;
}
.footer-title {
border-bottom: 1px solid #ddd;
border-top: 1px dotted #ddd;
color: #000000;
font-size: 24px;
padding-bottom: 10px;
padding-top: 10px;
text-align: center;
margin-top: 30px;
margin-bottom: 30px;
}
#related-posts .widget{
padding-left:6px;
margin-bottom:10px;
}
#related-posts .widget h2, #related-posts h2{
font-size: 17px;
font-weight: normal;
color: black;
font-family: Arial Narrow;
margin-bottom: 0.75em;
padding-top: 0em;
}
#related-posts a{
font-size: 18px;
color: #FF0000;
font-family: arial,halvanica;
font-weight: bold;
}
#related-posts a:hover{
font-size: 18px;
color: #00FF00;
font-family: arial,halvanica;
font-weight: bold;
}
#related-posts ul{
list-style-type:none;
margin:0 0 0px 0;
padding:0px;
text-decoration:none;
text-color:#000000;
}
#related-posts ul li {
list-style-type: none;
border-left: 2px solid #1399CF;
border-bottom: 1px dotted #1399CF;
margin-bottom: 3px;
padding-left: 30px;
padding-top: 10px;
background: rgba(92, 255, 0, 0.31);
}
#related-posts ul li:hover{
background-color: #1399CF;
border-left: 2px solid #B3CA3D;
border-bottom: 1px dotted #B3CA3D;
}
</style>
<div class='footer-title'>
<b>YOU MIGHT ALSO LIKE</b>
</div>
<script type='text/javascript'>
var relatedpoststitle=&quot;Related Posts&quot;;
</script>
<script src='https://googledrive.com/host/0ByR-ZXm7qkC1WHpsVUIwTzJMUWc' type='text/javascript'/>
<!--Remove--></b:if>
<!--Remove-->
<b:if cond='data:blog.pageType == &quot;item&quot;'>
<div id='related-posts'> <b:loop values='data:post.labels' var='label'> <b:if cond='data:label.isLast != &quot;true&quot;'> </b:if> <b:if cond='data:blog.pageType == &quot;item&quot;'> <script expr:src='&quot;/feeds/posts/default/-/&quot; + data:label.name + &quot;?alt=json-in-script&amp;callback=related_results_labels&amp;max-results=6&quot;' type='text/javascript'/></b:if></b:loop>
<script type='text/javascript'> var maxresults=5; removeRelatedDuplicates(); printRelatedLabels(&quot;<data:post.url/>&quot;); </script> </div></b:if>
<!-- related posts by tricks tower end—>
NOTE:→ This widget appears only on your post pages.
If you are facing any problem then please leave your comments below. You can also add this code as an hrml/javascript.
Posted by John Peter on 00:57 | No comments | Categories:
twitter cards
Twitter has rolled out a new technology called Twitter cards, which allow you to attach extra media experience to your tweets that has links to your content. It is pretty much similar to the Facebook Status. Whenever you post a link on Facebook, it automatically fetches the summary, title and feature thumbnail of your content. Recently, one of our users asked us How to Add Twitter Cards in Blogger? In this article, we will show you How to Add Twitter Cards in Blogger.


How Twitter Cards Work?
If the twitter cards functionality is correctly applied to your website, then you can notice a “View summery” link along your tweets. Whenever someone would click on that tweet it would display short summary of your content just like Facebook status. For more details see the following screenshot. Normally whenever you tweet about something, you play around with quite a few limitations. Most probably, you cannot tweet anything that exceeds 140 characters limit but not anymore. Now with twitter cards, you can get more productive display with lots of additional details about your content.
The biggest advantage of using Twitter Cards is that it increases the chances of people following you back through the latest content attribution. Most of the time people retweet you, but fails to give proper attributions. This not only happens to us, but we have also noticed the same thing from other big content creators. They tweet your article without giving a proper attribution like @blogger and etc. Though, it is their right to give you an attribution or not, but a publisher remains empty handed.
Lastly, it makes you stand out. Since, it is so new that it gives you people an attracting touch. Just like Google Authorship makes you stand out in search engine, Twitter cards make you stand out in the list of tweets.  Now you know the benefits of the Twitter cards, let move step ahead and see how to implement it in Blogger.
How to Add Twitter Cards in Blogger:
The First thing you need to do to is go to Blogger.com and login into your Google Account. After logging in, you will be redirected to Blogger Dashboard. Now go to Your Blog >> Template >> Edit HTML and search for the ending <head> Tag. On finding the tag, just above it paste the following piece of code.
<b:if cond='data:blog.pageType == &quot;item&quot;'>
    <b:if cond='data:blog.postImageThumbnailUrl'>
      <b:if cond='data:blog.metaDescription'>
        <meta content='summary' name='twitter:card'/>
        <meta content='@brainofcomputer' name='twitter:site'/>
        <meta content='@brainofcomputer' name='twitter:creator'/>
        <meta expr:content='data:blog.pageName' name='twitter:title'/>
        <meta expr:content='data:blog.metaDescription' name='twitter:description'/>
        <meta expr:content='data:blog.postImageThumbnailUrl' name='twitter:image:src'/>
        <meta expr:content='data:blog.homepageUrl' name='twitter:domain'/>
      </b:if>
    </b:if>
</b:if>
Congratulations: Do not forget to replace @brainofcomputer with the twitter username of your site. Once everything is done, simply press the “Save” button and Twitter cards are ready, and good to be live on your website.
Final Step: Requirements
To make the twitter cards work perfectly on your site, it is must for you to upload at least one image, and add description to your post manually using "Search description" tool allocated in the Blogger Post Editor. Without adding these two things, twitter cards would not give productive results.
Since, it is a new service. Therefore, it is clear that you have to apply to have this activated for your site. We have also applied from our site and let’s see when they will give it an approval. Here's what you need to do to apply.
Test your site with Preview Tool.
That's it. We hope this article has helped you in learning How to Easily Add Twitter Cards in Blogger. If anyone has any problem while applying this tutorial then, do not hesitate to leave a comment below. If you like the tutorial, leave a tweet for us at @brainofcomputer

Posted by John Peter on 00:51 | No comments | Categories:
Powered by Blogger.

Bookmark Us

Delicious Digg Facebook Favorites More Stumbleupon Twitter

Text Widget

Sample Text

Download