The Blog Contains Information About Blogging. It has Blogger Widgets, templates and Much More About Blogging.

Monday, 11 November 2013

Blogger VS WordpressToday we are going to talk about the most frequently asked question by newbies many times and some of them got confused to chose heir way. Either go with WordPress or go with blogger. Blogger and WordPress are the most popular blogging platforms in the modern era. There are millions of users on the internet using blogger and WordPress. But for a single author it becomes very difficult to say which one is better and has more potential than other one. However it has been discussed many times by professional bloggers and some of them recommend that WordPress is better due to its professional featureless and some of them recommended that blogger is better because it belongs to Google family. After couple of years blogger evolved, developed,  professionalized by goggle developer and now most of the pro bloggers highly recommend to use blogger because it is Search Engine Optimization friendly and it should be used for blogging.

Advantages of Blogger Over WordPress:

Template designing: That's the biggest advantage of a blogger template. In a blogger template, you can customize everything you want, from the <html> to </html> everything is customizable in blogger. this means that you can put add external css, add a meta refresh tag in your blog and millions of other things. So you can turn your template into a high quality professional template just by playing
Provides free hosting: Your entire blog is hosted on Google servers, no one can host your blog better than Google. Your entire blog means all the posts, images, blog template and all the widget codes are stored in Google data center. There is no bandwidth limit for a blogger blog. You can upload infinite images, Infinite blog posts on your blog. And the best thing its free.100% trustworthy servers: Blogger blog can't be hacked easily. The reason is already well known to you.Google is worlds best search engine and worlds no 1 ranked website.Your blog is hosted at Google servers so it can't be hacked easily.
Blog Speed: However we have personally received dozens of comments from WordPress user that why WordPress blog is taking more time in loading  page than Blogger Blog. There are many reasons. One of the best answer is that blogger blog is simply coded in XML/Html and Cascading style sheets while WordPress blog is created in PHP. So blogger will always one step forward than WordPress in this regard.

Which One Is Better For SEO

In the video given below, Matt Cutts explains which platform is better for search engine optimization
You already know that bloggers is Google platform so it will make blogger blog search engine optimization friendly for all popular search engines.
Blogger VS Wordpress
You might have heard that blogger template is fully prepared in Html/Css and XML so it becomes very easier to customize it template.Over 500 Million active users are using Blogger including some top brands like Twitter.Blogger uses widgets and plugins that help you to build a better and healthier site. It has a wide range of free Widgets inventory that enables us to add more spark to our site. There are some reputable developers like us who keeps on developing new widgets to keep this platform alive. You can access our Widget inventory or can even request us to develop any plugin that you need. Finally its up to you, make your final decision and comment below.
Posted by John Peter on 19:02 | No comments | Categories: ,
Generate Your Own Custom Hex Colors:
1. Drag the black bar on the "Hue" selector to generate the desired base color.
2. Next double click inside the Brightness/Saturation grid to activate the cursor. Drag it until the desired brightness is achieved.
The "Swatch" bar shows you the final color result.
3. The hex color code is generated at the bottom of the grid in the "Hex" box. Simply copy and paste the code into your page.
Next...Choose a Color Scheme!
Once you have your hex color value from the chart above, copy and paste it (without the #) into the form below the color wheel and it will generate a matching color scheme for your website.
This is a great tool to use if you're trying to come up with cohesive colors for your navigation, background, hyperlinks, etc.
Remember, it's best to choose 3-4 colors max and use them consistently throughout your website. It will make it look more cohesive.


Popular Hex Colors

#FFFFFF
#000000
#C0C0C0
#808080
#FF0000
#F0A804
#FFFF00
#008000
#0000FF
#800080


Posted by John Peter on 13:39 | No comments | Categories: ,


Meta+tag+generator+for+blogger+tricks+donor
Hi friends!  Now I am going to share with you a free meta tag generator tool for blogger. Meta description and meta keywords are the most popular html tags which are still recommended despite many arguments by several expert Search engine Optimizer. Some peoples who are not able to create meta tags so i think about meta tag automatic creator in this meta tag generator you only have to put your keywords, description, author name , etc and it create meta tags automatic.


Steps:
  1. write all necessary information in the boxes.
  2. then click on create meta tags & a warning is showed "are you sure".
  3. click yes then find the <Head> tag in your template.
  4. paste the tags below the <head> and save your template.
  5. its done


Description:
Keywords:
Author (Optional):
Robots (Optional):


Copyright © 2013  | All Rights Reserved Brain Of Computer
And if you liked this post, please like us on fbpage. Thanks!
Meta Tag Generator Tool by Tricks Donor
Posted by John Peter on 13:28 | No comments | Categories: ,
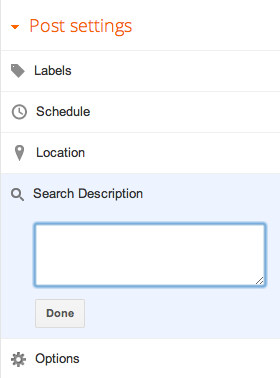
Search description for postsFor enabling search description to your blog you have to change some settings in your dashboard..When using a search engine (such as Google.com), you probably see a blurb of text underneath your search results that helps you decide whether or not that’s the site you want. For example: This is what appears when you search for “Blogger.”
The descriptive line of text that appears under the link is the search description.
If you don't specify a search description for your blog, search engines will establish one for you based on your blog’s content.
To create your own search description, just go to Settings | Search Preferences and click Editnext to "Description" to reveal a text field. Select Yes, write in your text, and click Save changes.

A few examples of blog search descriptions:

Settings to create a search description on Blogger
  • “A blog about social networking and web design.”
  • “A journal of my year in Paris.”
  • “Healthy southern-style cooking.”
Enabling this feature will display a “Search Description” option in the Post Settings panel that allows you to enter a search description for individual posts.
Posted by John Peter on 13:13 | No comments | Categories: ,
Email Subscription Widget For Blogger
Its time to make your Blog More stylish with this email Subscription Widget. Look at the screenshot given at the left side of t his post to better understand how the widget actually looks.This widget is developed in css3. This widget is made to boost the number of your email subscribers. For adding this code, just follow the simple steps given below. Before adding this widget to your blog, have a look at its features. I promise that this widget will never let you down and it will boost your email subscribers. This widget also provides Facebook, Twitter and Google plus and feed buttons along with email subscription widget.

Features of Email Subscriptione Widget


  1. Made with css3
  2. no java script no j query
  3. plain html and style sheet code
  4. no need to edit your template

How To Add Email Subscription Widget

Its very simple to add email subscription widget in you blog, just follow the simple steps given below.
  1. Go to your blog dashboard
  2. go to layout
  3. click on add a gadget
  4. Select html/java script
  5. paste the code given below inside.
<style>
.tbisubscribe {
border: 1px solid #56DB23;
padding-right: 8px;
padding-left: 6px;
padding-top: 8px;
padding-bottom: 8px;
width: 284px;
background: #EDFFFD;
}
.tbisubscribe:hover {
-moz-box-shadow: inset 1px 1px 10px 1px rgba(249, 215, 126, 1);
-webkit-box-shadow: inset 1px 1px 10px 1px rgba(249, 215, 126, 1);
box-shadow: inset 1px 1px 10px 1px rgba(249, 215, 126, 1);
}
.tbimailbox {
border: 1px solid #D3D3D3;
-webkit-border-radius: 4px;
border-radius: 4px;
-moz-box-shadow: 1px 1px 1px 1px rgba(255, 172, 84, 0.4) inset;
-webkit-box-shadow: 1px 1px 1px 1px rgba(0, 0, 0, 0.4) inset;
box-shadow: 1px 1px 1px 1px rgba(0, 0, 0, 0.4) inset;
color: #666;
font: 14px "trebuchet ms", sans-serif;
padding: 7px 15px;
width: 140px !important;
-webkit-transition: all 0.5s ease-in-out;
-moz-transition: all 0.5s ease-in-out;
-ms-transition: all 0.5s ease-in-out;
-o-transition: all 0.5s ease-in-out;
transition: all 0.5s ease-in-out;
}
.tbisubmit {
font: bold 12px Tahoma, Geneva, sans-serif !important;
font-style: normal;
color: #ffffff !important;
background: #ff5714 !important;
border: 0px solid #ffffff !important;
text-shadow: 0px -1px 1px #222222;
box-shadow: 2px 2px 5px #000000;
-moz-box-shadow: 2px 2px 5px #000000;
-webkit-box-shadow: 2px 2px 5px #000000;
border-radius: 10px 10px 10px 10px !important;
-moz-border-radius: 10px 10px 10px 10px;
-webkit-border-radius: 10px 10px 10px 10px;
padding: 8px 15px !important;
cursor: pointer !important;
margin: 0 auto !important;
height: 45px !important;
}
</style>
<link href='http://fonts.googleapis.com/css?family=Oswald' rel='stylesheet' type='text/css' />
<div class='tbisubscribe'>
<div style='color: #666666; font-weight: bold; font: 22px Oswald, cursive; margin: 0px 0px 10px 15px;'>Get Free Updates in your Inbox</div>
<div style='margin: 10px 0 0 6px;'>
<form action='http://feedburner.google.com/fb/a/mailverify' class='emailform'
method='post' onsubmit='window.open(&apos;http://feedburner.google.com/fb/a/mailverify?uri=brainOFComputer&apos;, &apos;popupwindow&apos;, &apos;scrollbars=yes,width=550,height=520&apos;);return true'
style='margin: 0pt;' target='popupwindow'>
<input name='uri' type='hidden' value='brainofcomputer' />
<input name='loc' type='hidden' value='en_US' />
<input class='tbimailbox' name='email' onblur='if (this.value == &quot;&quot;) {this.value = &quot;Enter your email...&quot;;}'
onfocus='if (this.value == &quot;Enter your email...&quot;) {this.value = &quot;&quot;}'
type='text' value='Enter your email...' />
<input alt='' class='tbisubmit' title='' type='submit' value='Subscribe'/>
</form>
</div>
<div style='border: none; color: #666666; font: 22px Oswald, cursive; margin: 25px 0 0 5px;'>Follow us on:</div>
<div style='margin: -32px 0 0 120px;'>
<a href='https://www.facebook.com/brainofcomputer' target='_blank' title='Join us on Facebook'><img src='https://blogger.googleusercontent.com/img/b/R29vZ2xl/AVvXsEi3a7JLoVAt_Ywmm10vcWJtSmq4g3cRxF5_uRiP_reXES5e0DDrcVSVyCDRnoNlK-nqNbQvlipDQUoWMZGllXJmBXyseYNV7g8P5cE-W2xsejBhO80-uy3pKcAkcHh-hIJrFqWQXz9xP2s/s32/facebook500.png' alt='facebook'/></a>
<a href='https://www.twitter.com/brainofcomputer' rel='nofollow' target='_blank'
title='Follow us on Twitter'><img src='https://blogger.googleusercontent.com/img/b/R29vZ2xl/AVvXsEjvPqPjJJ82fBQRqPzEskei9Xt1xeF4QfWXv5IS7qrZZUvoBww2VNBVRBNHbuuAONrxRLblRJWnwkO-u_SodQGHu8fCB_GKfRPwfjKh81k-9de9uS7KKcBgiM6ijeQXol1MHfxMpJgGAVM/s32/twitter.png' alt='twitter'/></a>
<a href='https://plus.google.com/102309133279826094256' rel='nofollow' target='_blank'
title='Follow us on Google+'><img src='https://blogger.googleusercontent.com/img/b/R29vZ2xl/AVvXsEiwjDhVqcaQam8GKu2B0F9jnJm8qRoCem6kN2qB1gAlRDHMs0eFaGk7AMDVDQ5dlfONhRJ9DH0TfyWQED5W0d3Dxn3HQ4oYK8SOI0IsB7g-6qpPPB4llqAjLcjHpl7c9QsPbbdZZ5J5LWE/s32/googleplus-revised.png' alt='gplus'/></a>
<a href='http://feeds.feedburner.com/BrainOfComputer' rel='nofollow' target='_blank'
title='Subscribe to RSS'><img src='https://blogger.googleusercontent.com/img/b/R29vZ2xl/AVvXsEjwjBOWVsm2sAjm4RsryGYqfkLOxgXkarBubdsGCeDT6n0R5ruKSsbirelLSUJaNfEJbg3MQXJrtpkvUMGn6Zu5wS9jmlni_1yPrSqgRY3oIX7q0Fb2kPo3mCP198z5ky9rDbPStPxPJgo/s32/rss.png' alt='rss'/></a>
</div></div>

Make sure to change highlighted codes. Now save the widget and you are done. Leave your comments below.
Posted by John Peter on 12:07 | No comments | Categories: ,

Saturday, 9 November 2013

image
The more page views you get, the better will be your search engine rankings.Engaging your readers is nothing but how many pages a single user visits on your blog at a time. Page views are definitely not among the first of your worries, because the initial months are busy in setting up the blog, tweaking the design, getting people to know about your new blog and so on. Many newbie bloggers are even unaware of Google analytics code and get it installed quite later. But unfortunately many bloggers fail to achieve this, which results in a higher bounce rate. In this post i will share some of the best tips that will help you to keep your readers engaged and kick you blog page views like a sky rocket…

 What Are Page Views?

Page views are an important measure of the traffic received by your site and denotes the requests sent to the server to load that page. In simple terms it denotes the amount of times a page gets viewed.

How Do You Track Page Views?

Well the easiest and simplest way to keep a count of page views that your blog or site receives is to use Google analytics. You will need to set up a free account and then input your site details and get a tracking code.
This code needs to be installed on your site and verified. Once it is verified, you will start receiving free info about the number of page views and many other important criteria in your Google analytics report.

Difference between Page Views and Unique Page Views

Okay so now you know about page views. But if you have looked at your Google Aanalytics reports closely, you might have noticed an additional kind of statistics called as unique page views. Unique page views denote the number of times an individual visitor has viewed your page. No matter how many times he/ she tries to load the page, only one unique page view will be calculated.
Unique page views reflect the real picture about your traffic, but page views are considered more important.

Why Are Page Views Important?

Page views are important in more ways than one. First of all let us speak about advertisers. Google adsense is the most popular form of advertising, especially for beginner bloggers. Google adsense earnings are based on page views and clicks. So more page views obviously translate into more adsense earnings and that is something every blogger is looking forward to.
It is a good thing to increase page views even if you are not looking at the monetary aspect. More page views mean more reader engagement and that is something that every blog and its owner should aspire for. More page views will reduce your bounce rates and a low bounce rate is another benchmark for good blogs.

How to Increase Page Views?

By now you have understood the importance of getting more views per page and are desperate to learn techniques that increase page views. Here is a comprehensive list of methods that actually work and are super easy to implement as well:


1. Great Content

This is the most simple and important thing to remember if you want to increase your page views. If the reader likes your article, he will obviously stay on your blog for more than 5 minutes browsing digging your blog. Useful, original and interesting will always leave your readers hungry for more. So it time that you should work out on your blog, writing quality content for your readers. Its simple, you give the readers, and the readers will give what you want.

2. Excerpts on Homepage.
You might have seen many blogs which shows full post on the homepage. I really don’t like these blogs because I have to scroll all way down to find whats more ahead. This will gradually decrease your page views. Showing excerpts are the best way to increase page views and manage post on the home page highlighting multiple posts.

3. Create Catchy Titles.
Make sure you create a catchy article which grabs your reader attention and force them to read the whole article. Its also important if you are showing excerpts on your homepage or front page. Eye grabbing titles are more viewed both on site and of site if shared them on twitter, facebook and others

4. Interlinking.
Interlinking means to link you previous articles with the current one. Now there are two advantage of interlinking. First it would help you to rank your articles higher in search engines, as interlinking works like a vote to the article. And second one would keep your readers engaged with your blog. If you are writing something that relates to the previously written article, just link to them. For example, you can see above how I linked to my previous article.


5. Improve Load Time.
You might not wanna overlook this section. Because loading time plays an important role for page views. The less loading time your blog takes, the more page views you get. And the more load time it takes, the higher will be your bounce rate. A reader will quickly bounce of the page if the page doesn’t loads in no more than 7 secs. So its important that should also work out on your blog HTML and CSS for more page views.


6. Search Box.
This is an important element for any bloggers blog. The search box should be placed where its easily viewable to the readers like at the top navbar or at the sidebar. The Search box helps your readers to find and locate your previous articles on your blog in turn increasing your page views.


7. Easy Navigation
Make sure your blog is easy to navigate. Don’t confused your readers with confused links all over the blog. Some of your readers might be interested to dig your blog and look for other interesting articles. Display your blog categories in the navbar, add tags cloud, display blog archives as hierarchy. Make sure you do create an optimized sitemap or a archive page where you show all your A-Z post.


8. Categorize your Article.

This is the most important aspect if you are a blogger user and displaying related post below your article. As you know blogger allows you to categorize your post by using labels only. You would mess up your article and blog if you use more than 2 or 3 unrelated labels.
For instance if you have written an article on Health and Fitness and you have labelled it with “health” and “astrology“, this would display articles related to health and astrology too. Now why a reader would be interested to read an article on astrology if he wants to read more health related articles.
So its important that you categorize your post with a single label or a two at most, related to the first one. This might not be a problem with WordPress users. You can automatically generate related post with the plugin.

9. Display Related Post
You might have read this many times, but this is the most common practice to keep the reader engaged to your blog. If the reader reads your full post from start to end and finds your article more interesting, he/she will surely click on one of the related post below the post. As you can see below I have added the related post widget which shows 4 related articles to this topic. Don’t display more than 5 articles, this might irritate the reader seeing a huge list of related links.

10. Featured Post.
Readers are most likely to visit those pages which are most popular or the most commented on a blog. You can show your popular articles or the most commented articles in your sidebar, or as a jquery slider on the homepage. Its also important that you should keep these post optimize for more page views.
Posted by John Peter on 16:47 | No comments | Categories: ,
Best Widget To Make Your Sidebar Header More Stylish
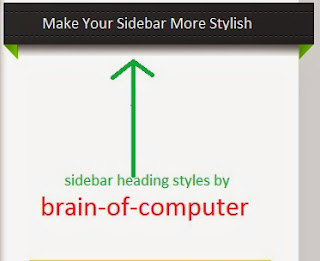
We have developed another code in css3 to make your sidebar more stylish. This widget is designed in css3. This lightweight widget will give your blog a stunning look. This widget changes your sidebar h2 styles into highly optimized and stylish sidebar h2. This widget adds a separate style on sidebar h2, The background image used in the style sheet is very small in size and it is hosted on picassa so you don't need to worry about server errors and image loading time. Another great thing is you don't need to add separate html codes in your blog. This widget works perfectly on sidebars having 320 px width so, make sure that your sidebar width is in between 300 to 320 px.

FEATURES OF Sidebar Header Styles

  1. Highlight Your Sidebar Header
  2. It doesn't affects your page loading time 
  3. No Java script no j query
  4. Plain style sheet code designed in css3
  5. No need to add extra html codes in your blog
  6. Eye catching look

How To Add New Sidebar Styles In Blogger Blog

For adding this widget in your blog, Proceed as follows:
  1. Go to blogger.com
  2. Open Your Blog.
  3. Go To "Template".
  4. Click "Edit HTML".
  5. Now, Search For "]]></b:skin>" 
  6. Add the code given below above "]]></b:skin>"

Read: How To Add Contact Us Page To Your Blogger Blog

    .sidebar h2 {
    background: url(https://blogger.googleusercontent.com/img/b/R29vZ2xl/AVvXsEiBuRjO89A_WhnW6vd1L7NF1asc9S2EGARg0d9gaQGNqvlNmp_1TDY8BaMLpFuZTDvUtVKg-jVVBWxvbJiUN2x2uV3S9pl5lMu5bvyIINxmo6gzo_KCKvJr-fOhvDzPU8BMa-1eTHMtl6Gi/s400/sidebar2_h2.png) no-repeat scroll 0 0 transparent;
    color: rgb(213,213,213);
    height: 66px;
    font-size: 14px;
    font-weight: bold;
    margin: 0 0 -28px;
    position: relative;
    left: -30px;
    top: 0;
    width: 362px;
    text-align: center;
    padding: 15px 0 0;
    font-family: helvetica;
    padding-bottom: 15px;
    }
    You may need to change the value of highlighted code to align the sidebar heading correctly Comment your questions below and let us know!

    Read: How To Add New and Old Ribbon To Latest And older Posts

    Posted by John Peter on 12:26 | No comments | Categories: ,
    Powered by Blogger.

    Bookmark Us

    Delicious Digg Facebook Favorites More Stumbleupon Twitter

    Text Widget

    Sample Text

    Download