The Blog Contains Information About Blogging. It has Blogger Widgets, templates and Much More About Blogging.
Showing posts with label Command Prompt. Show all posts

Wednesday, 4 December 2013

Tip To Shutdown Windowsuse this in emergency
Try to open:
Run -> cmb -> shutdown -a
This prevent the shutdown.
create a new shortcut.. then write;
shutdown -s -t 0 = this is for shut down in 0 seconds (t = time s=shutdown)
shutdown -r -t 0 = same but this is for restart comp. in 0 seconds..
(only for windows xp)
in win.98 this is different; we were wrote rundll32.exe -s or something like this..i couldnt remember right now..


Stay Connected..............
Posted by John Peter on 02:28 | No comments | Categories: , , , ,

Monday, 28 October 2013

Its very easy to lock a folder without using a software, watch the video tutorial.Have you ever had the need for a protected folder, but didn't want to use Window's basic security? Then create your own!


Step 1: Create a new text file.
Step 2: pen the text file with notepad.
Step 3: Enter the source code given below in the text file and save it as locker.bat.
Given below is the source code of locker.bat


@ECHO OFF
title Folder Private
if EXIST "Control Panel.{21EC2020-3AEA-1069-A2DD-08002B30309D}" goto :UNLOCK
if NOT EXIST Private goto :MDLOCKER
 :CONFIRM
echo Are you sure you want to lock the folder(Y/N)
set/p "cho=>"
if %cho%==Y goto :LOCK
if %cho%==y goto :LOCK
if %cho%==n goto :END
if %cho%==N goto :END
echo Invalid choice.
goto :CONFIRM
 :LOCK
ren Private "Control Panel.{21EC2020-3AEA-1069-A2DD-08002B30309D}"
attrib +h +s "Control Panel.{21EC2020-3AEA-1069-A2DD-08002B30309D}"
echo Folder locked
goto :End
 :UNLOCK
echo Enter password to unlock folder
set/p "pass=>"
if NOT %pass%== password goto :FAIL
attrib -h -s "Control Panel.{21EC2020-3AEA-1069-A2DD-08002B30309D}"
ren "Control Panel.{21EC2020-3AEA-1069-A2DD-08002B30309D}" Private
echo Folder Unlocked successfully
goto :End
 :FAIL
echo Invalid password
goto :end
 :MDLOCKER
md Private
echo Private created successfully
goto :End
 :End
Step 5 execute the bat file,
First time when you execute the bat file, it creates a new folder named "Private" , paste your files inside it. Now execute the file second time, Second time when you execute the file, it locks the folder. Third time when you execute the file it asks you the password to unlock the folder, default password is "password" . After entering the password, folder is unlocked.
Posted by John Peter on 12:21 | No comments | Categories: , ,

Saturday, 26 October 2013

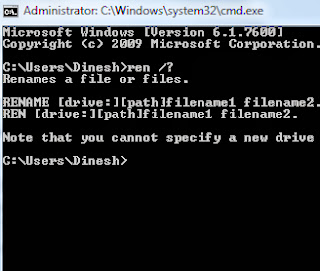
rename commandRen or rename command can be used to rename a directory, folder, file with the help of this command it is very easy to rename a file, the syntax of the command is also very easy and simple. This blog will guide you how to change the directory name or file name or file extension in command line.

Renaming a File

We can use the built-in command line utility rename to rename a file. Note that this command is just to rename a file keeping it in the same location and can’t be used to rename as a file in a different folder. Syntax of rename command:

rename  file_path   new_name
Example:
rename  d:\data\file.html   file2.html
After executing the above command we’ll have file2.doc in the folder d:\data

Change file extensions using rename command:

We can change the extension of a set of files in one step using rename command. For example, you have set of files with extension .html and you want to rename them to .txt.  You can do this with the below command We can change the extension of a set of files in one step using rename command. For example, you have set of files with extension .html and you want to rename them to .txt.  You can do this with the below command
rename  *.html   *.txt

Rename command works in all Windows versions   XP, Vista and Windows 7.

Renaming a Directory


We can use Rename command to rename directories too. See the syntax below.
Rename  dir_oldname  dir_newname

Example:
G:\data>mkdir dir1
G:\data>dir /b
dir1
G:\data>rename dir1 dir2
G:\data>dir /b
dir2
G:\data>

Note that, with rename command, we can’t move the files to another drive or directory. This command just renames the existing file/folder and does not create a new file.  That is why it does not accept full path for the target file name. If you try to do that you will get the error – “The syntax of the command is incorrect.
Example:
C:\docs>ren 1.txt c:\docs\2.txt
The syntax of the command is incorrect.

The below rename command works fine.
C:\docs>ren c:\docs\1.txt 2.txt
C:\docs>dir /b
2.txt

We can also use ren (the short form of rename) for rename operations.  Both Ren and Rename refer to the same command.This command can be used to rename files or directories on all latest Windows .
Posted by John Peter on 08:36 | No comments | Categories: ,

Saturday, 5 October 2013

Windows Installation DateSome days back I talked about finding your Windows installation date using Command Prompt. And some people asked me if they could alter this date manually. So this article is to guide them through the complete process for changing date of your Windows installation using Registry Editor.


Changing Windows Installation Date

  1. Open “Run” dialog box. You can do this either by typing “Run” in the Start Menu search or by pressing the “Win+R” key combination.
  2. Now type “regedit” in the box that appears. You can alternatively type “regedit” in the Start Menu search to open Registry Editor.
  3. Navigate to “HKEY_LOCAL_MACHINE > SOFTWARE > Microsoft > Windows NT > CurrentVersion > “ or “HKEY_LOCAL_MACHINE > SOFTWARE >  Windows NT > CurrentVersion > Windows Installation Date
  4. You will find a key named “InstallDate”
  5. Double click on it and it will show a numerical value. This is the number of seconds between 1/1/1970 and your installation time.
  6. To change your Windows installation date just add or subtract the duration by which you want to change your date. If you wish to add one day to your installation date, then add “60x60x24=86400″ to the value. If I wanted to add one day to my installation date, I would change the value to “1350224291″. Windows Installation Date

Posted by John Peter on 08:42 | No comments | Categories: ,
Find Windows Installation Date With Command PromptIf you just want to know about the installation date of your Windows, then you can easily get it using Command Prompt. systeminfo is a command in Windows that gives you details about the configuration of your hardware and also about the operating system. It displays the security information, information about the RAM, network adapters, the disk spaces and the Product IDs.


Getting Windows Installation Date With Command Prompt
  1. Open “Run” dialog box. This can be done by pressing Win + R on the keyboard.
  2. Now type “cmd” and hit Enter.

  3. Now type the command given below in the Command Prompt Window.
    systeminfo | find /i "Original Install Date"
This will display the Windows installation date and time.


Many people suggested some other ways too, like you can check the creation date of your Windows folder, or you can check the first update in your Windows Update history. But both of these methods work until and unless you did a clean install on your system. They will show different date if you have upgraded your version of Windows.
Instead of the complete command you can use systeminfo which will fetch you much more information about your system.
NOTE This method is tested on Windows 7 and Windows 8. It should work on older versions too. If it fails, use the command “systeminfo” and scroll up to find the Windows installation date.

Posted by John Peter on 07:32 | No comments | Categories: ,

Wednesday, 2 October 2013

User account
This Article explains how to create a user account, how to turn it into administrator and how to delete it.User accounts are the primary means of access for real people to the system, and these accounts insulate the user and the environment, preventing the users from damaging the system or other users, and allowing users to customize their environment without affecting others.
Every person accessing your system should have a unique user account. This allows you to find out who is doing what, prevent people from clobbering each others' settings or reading each others' mail, and so forth.
Each user can set up their own environment to accommodate their use of the system, by using alternate shells, editors, key bindings, and language.

Watch the video tutorial given below for better understanding:

note: "username" is the name of account that I wants to create. you can use any name to create your account(remember that you can use a-z letters and numbers).
to create a user account:
net user username /add
to turn a standard user into administrator:
net localgroup administrators username /add
to delete a user account:
net user username /del
Only for Educational purpose.Comment your queries and stay tuned! 
Posted by John Peter on 10:50 | No comments | Categories: ,
Powered by Blogger.

Bookmark Us

Delicious Digg Facebook Favorites More Stumbleupon Twitter

Text Widget

Sample Text

Download